Contents
- Overview
- PCI SAQ
- SAQ A
- SAQ A-EP
- SAQ D
- Hosted Payment Page
- HPP Walkthrough
- HPP & 3D Secure
- HPP & FPRN
- iframe Embedded HPP
- Paylink via API
- Drop-In
- Hosted Fields
- Form Post
- Form Post Walkthrough
- Form Post & 3D Secure
- Form Post & FPRN
- AJAX Post
- AJAX Post Walkthrough
- AJAX Post & 3D Secure
- AJAX Post & FPRN
- Server Side Post
- Server Side Post Walkthrough
- Server Side Post & 3D Secure
- Server Side Post & FPRN
- 3D Secure
- 3D Secure v2
- Liability Shift
- 3D Secure Authentication
- Browser-Based Authentication
- Decoupled Authentication
- Out of Band Authentication
- Frictionless vs Challenge
- 3D Secure v2 Challenge Preference
- Non-Payment Authentication
- Strong Customer Authentication
- Merchant requested vs Automatic exemptions
- Testing 3D Secure
- 3D Secure Fields
- 3D Secure & Risk Management
- Address Verification Service (AVS)
- Testing
- AVS Result Codes
- Fail Proof Result Notification
- Stored Card
- 3D Secure & Rebilling
- Stored Card Tokens
- Supported Payment Methods
- Stored Card Implementation
- Subscription Invoices
- Implementing Subscription Invoices
- Create Subscription
- Update Subscription
- Delete Subscription
- Query Subscription
- Query Customer
- Query Invoice
Overview
You can review the Windcave REST API reference for detailed API functions and message explanations.
For detailed information about integration models, features, functionality and detail about getting started with REST API please review the below page.
To get started with your Windcave REST API integration you will need a development account, to setup a new account please contact the sales team for a quote and complete the requirements gathering form to request development credentials.
Once signed up our team will create development credentials based on the requirements provided in the above form, we will provide a API username and API Key; both of which must be securely transferred and stored on your web-server.
PCI SAQ
PCI SAQ (Self-Assessment Questionnaires) are validation tools intended to assist merchants and service providers to report the results of their PCI DSS self-assessment. For further information on SAQs please see the PCI security standards website.
Different functionality/integration methods are available that fit into the varying PCI SAQ levels, this section will help define what level PCI SAQ is needed to integrate to the REST API functionality.
Before choosing your desired integration method it is recommended that you speak with your primary merchant acquirer to confirm they allow the use of said integration method.
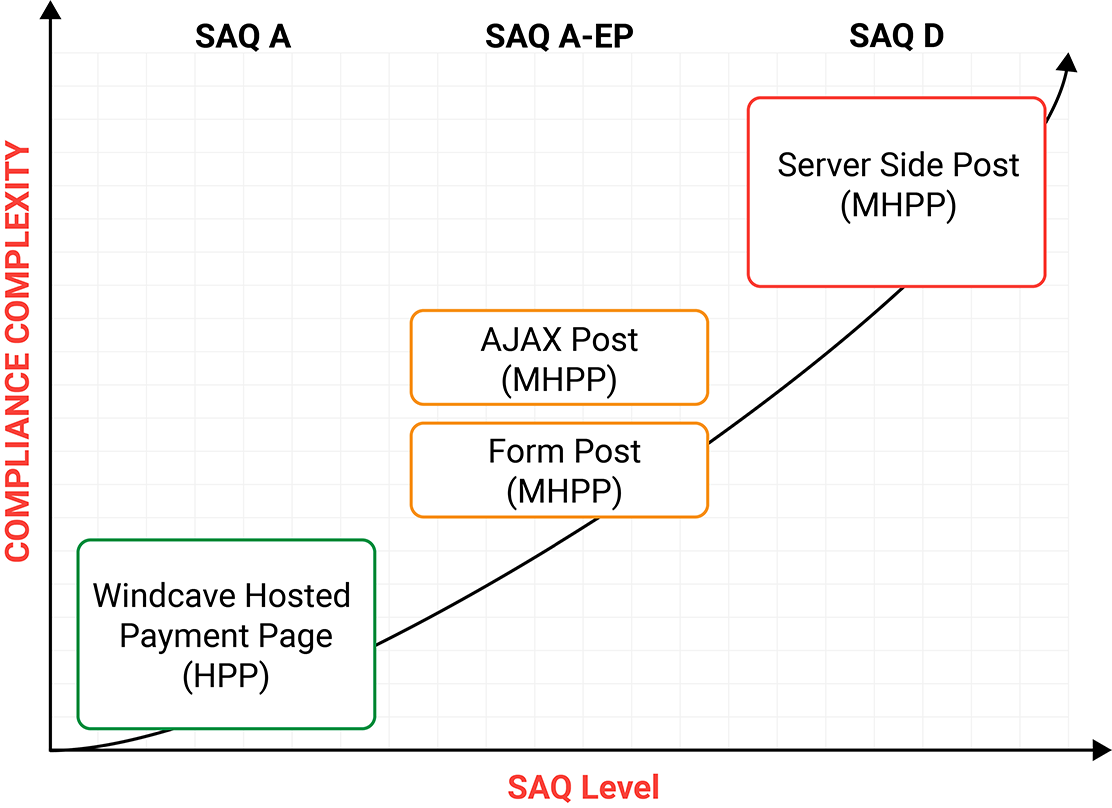
SAQ A
The Hosted Payment Page (HPP) provides merchants a PCI SAQ level A compliant solution by hosting the payment page/card capture within Windcave's secure network. At point of payment customers are redirected from the merchants website to the Windcave hosted payment page to enter their payment details securely, once entered the customer is redirected back to the merchants website with the payment result ensuring all payment details are capture securely within Windcave's secure payment environment.
For further details on integrating see the Hosted Payment Page section.
SAQ A-EP
The Merchant Hosted Payment Page (MHPP) utilizing client side form post or AJAX Post provides merchants a PCI SAQ level A-EP compliant solution while allowing a more native in appearance payment page. At point of payment sensitive payment details are posted directly to the Windcave secure environment from the customers browser using either a form post or AJAX post integration, during the payment process the customer remains on the merchants website however payment details are not allowed to pass through the merchant server.
For further details on integrating see the Windcave Form Post or AJAX Post section respectively.
SAQ D
The Merchant Hosted Payment Page (MHPP) utilizing server side post provides merchants a PCI SAQ level D compliant solution where merchants utilize a fully native payment page. At point of payment sensitive payment details are posted from the merchant server direct to Windcave, with card details being captured on the merchant server merchants are required to be PCI SAQ level D compliant. This integration method may not be supported by all acquirers, as such please consult with your primary merchant acquirer or Windcave Sales team before proceeding with a MHPP server side post integration.
For further details on integrating see the Server Side Post section.
Hosted Payment Page
Please note this section is documented in terms of purchase transactions, however Auth/Complete and Validate transaction types are also supported in these examples.
The Windcave Hosted Payment Page (HPP) is a payment page hosted on the Windcave secure payment network, merchants redirect their customers to the Windcave HPP to safely and securely enter their payment details before being redirected back to the merchant's website.
Commonly referred to as a hosted payment solution this integration method requires the least amount implementation effort and the lowest PCI compliance standard (PCI SAQ Level A) while still maintaining high levels of customisation and functionality.
HPP is regularly used in online booking, shopping carts, bill payments, and many more applications where secure payment processing is required.
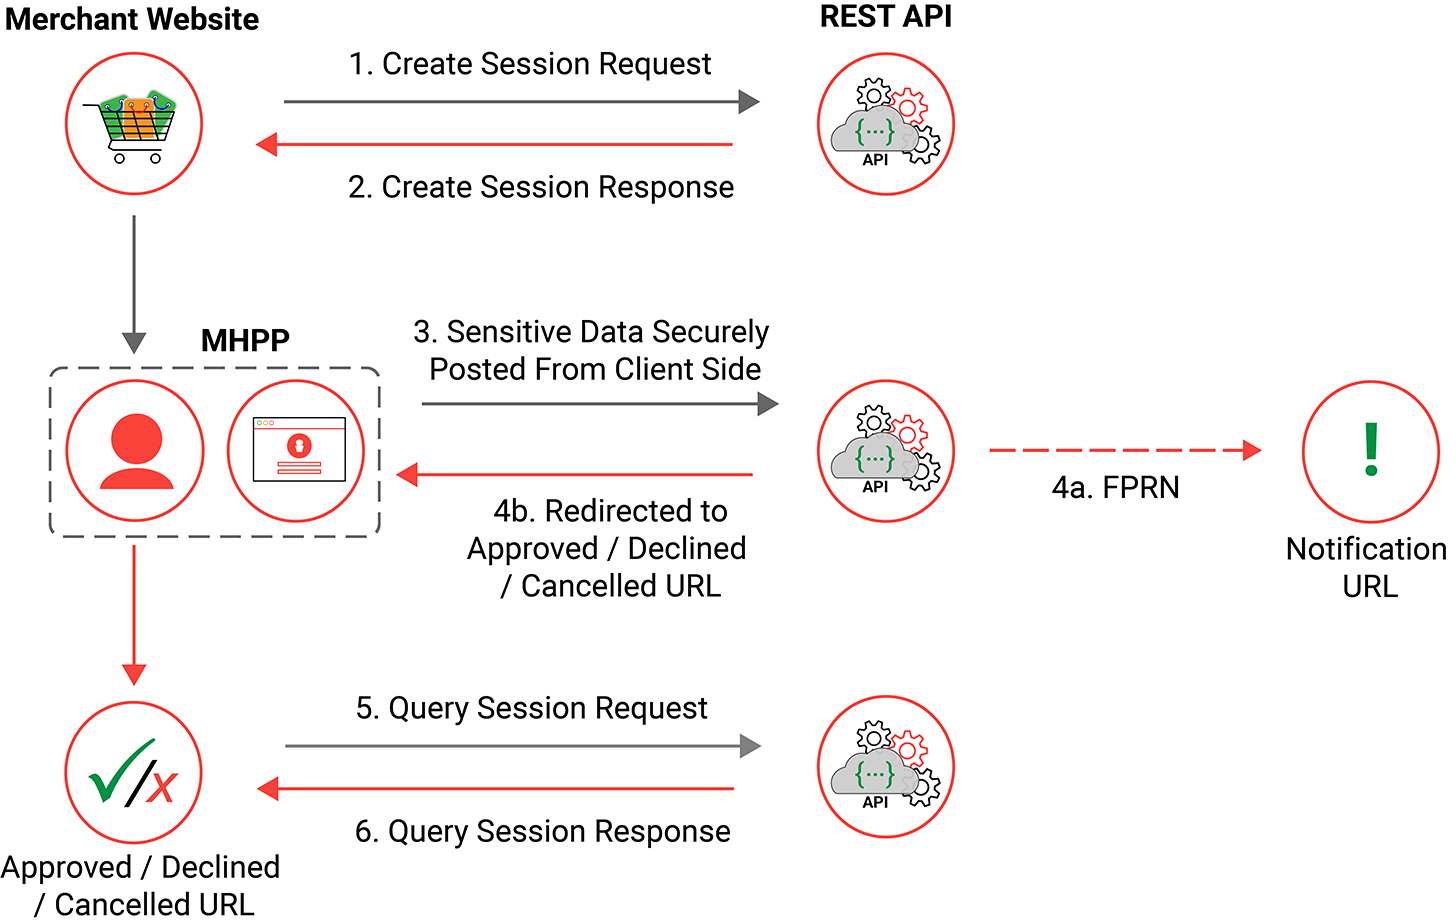
HPP Walkthrough
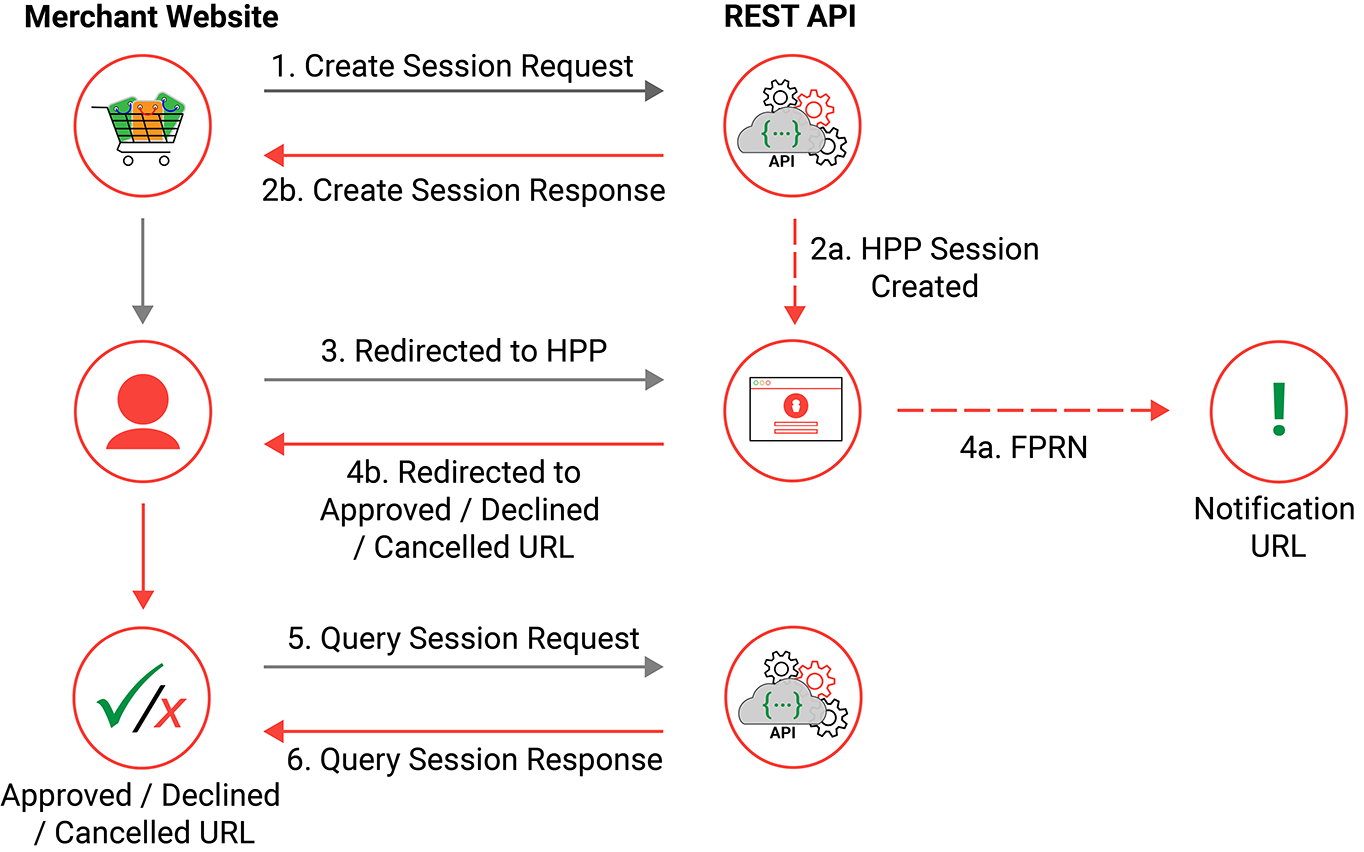
In order to provide each cardholder a secure HPP to enter their sensitive payment information a session is created in the Windcave host, this session handles all interactions between the user's browser and the Windcave secure host including any multi-stage payment interactions.
New sessions are created on request and triggered by the merchant web server sending a create session request, the newly created session will be given a session id which is used to reference the users payment while navigating between the merchant website and HPP.
The below flow diagram represents a high level HPP transaction flow from start to finish, more in-depth information for each stage of the flow is detailed in the next section.
Creating a Session
In order to provide the user with a payment page to enter their payment information the merchant webserver first needs to create a hosted payment page session.
This is achieved by the merchant webserver sending a create session request with the transaction specific information i.e. amount, currency, merchant reference and call back URL’s and merchant REST username and authentication. Below is an example of a simple create session request:
Endpoint:
POST https://sec.windcave.com/api/v1/sessions
Headers:
          Content-Type:application/json
          Authorization: Basic ABC123
Request Body:
          {
           "type": "purchase",
           "amount": "1.00",
           "currency": "NZD",
           "merchantReference": "1234ABC",
           "callbackUrls": {
            "approved": "https://example.com/success",
            "declined": "https://example.com/fail",
            "cancelled": "https://example.com/cancel"
           },
           "notificationUrl": "https://example.com/txn_result?123"
          }
By default new sessions have a 72 hour timeout period, alternatively merchants can control when the session expires by using the expires field in the create session request.
For more in-depth information on sending a create session request and processing the response please refer to the API reference documentation here.
Redirecting the User
After requesting the HPP session the merchant webserver next needs to be able to redirect the user to the newly created HPP to securely enter their payment details.
To achieve this the merchant webserver must read the URL link where “rel” is “hpp” from the create session response, and redirect the user to it. Below is an example of a simple create session response body and the “rel” as “hpp” containing the URI of the HPP:
HTTP Response Code:
202 Accepted
Response Body:
          {
           "id": "00001200030240010c9e7ceadd26a6d8",
           "state": "init",
           "links": [
            {
             "href": "https://sec.windcave.com/api/v1/sessions/00001200030240010c9e7ceadd26a6d8",
             "rel": "self",
             "method": "GET"
            },
            {
             "href": "https://sec.windcave.com/pxmi3/EF4054F622D6C4C1B512FC9E81F547FA45A6ED23237FF3B236283493E38BF97630A40CC2F072621C2",
             "rel": "hpp",
             "method": "REDIRECT"
            }
           ]
          }
Also returned in the create session response is a URL that can be used in the Query Session request, this is read where the “rel” is “self” and is further detailed in the Obtaining the Transaction Result section.
For more in-depth information on sending a create session request and processing the response please refer to the API reference documentation here.
Entering Payment Information
After being redirected to the HPP the user will be presented with the available payment option(s) (a default option pre-selected based on the merchants REST user configuration) and an area to enter their payment information.
The user can review the payment details supplied by the merchant and if everything is correct enter their payment information and submit the transaction, alternatively if the details do not appear correct the user can cancel the payment.
Result Page
After submitting or cancelling the payment the user will be presented with a page displaying the result of their transaction along with transaction unique information for their reference.
Returning to the Merchant Website
After clicking next on the HPP result page the user is automatically redirected to the callback URLs specified in the create session request with a sessionId parameter in the URL.
Below is an example of the URL where the customer was redirected to the approved callback URL specified in the create session request.
https://example.com/success?sessionId=00001200030240010c9e7ceadd26a6d8
Obtaining the Transaction Result
The merchant webserver now needs to obtain the result of the transaction to update its internal order system etc.
Upon receiving a response to any of the callback URLs the merchant webserver should extract the sessionId value, then submit a query session request to obtain the transaction result. Below is an example of the query session HTTPS GET request:
Endpoint:
GET https://sec.windcave.com/api/v1/sessions/00001200030240010c9e7ceadd26a6d8
Headers:
          Content-Type:application/json
          Authorization: Basic ABC123
The response returned from the REST API contains the result of the specified session, this includes all transaction attempts made during the session. The merchant webserver must read the “authorised” attribute of the 0th transaction to determine the final result of the session, if true is returned the payment has been successfully authorized otherwise false will be returned to indicate payment has not been authorized.
Depending on individual merchant requirements additional details should be read and used to update the merchants internal order system. Below is a simple example of the query session response:
HTTP Response Code:
200 OK
Response Body:
          {
           "id": "00001200030240010c9e7ceadd26a6d8",
           "state": "complete",
           "type": "purchase",
           "amount": "1.00",
           "currency": "NZD",
           "currencyNumeric": 554,
           "merchantReference": "1234ABC",
           "expires": "2020-05-11T03:06:07Z",
           "storedCardIndicator": "single",
           "callbackUrls": {
            "approved": "https://example.com/success",
            "declined": "https://example.com/fail",
            "cancelled": "https://example.com/cancel"
           },
           "notificationUrl": "https://example.com/txn_result?123",
           "storeCard": true,
           "clientType": "internet",
           "methods": ["card"],
           "links": [
            {
             "href": "https://sec.windcave.com/api/v1/sessions/00001200030240010c9e7ceadd26a6d8",
             "rel": "self",
             "method": "GET"
            },
            {
             "href": "https://sec.windcave.com/api/v1/transactions/0000000c01159507",
             "rel": "transaction",
             "method": "GET"
            }
           ],
           "transactions": [
            {
            "id": "0000000c01159507",
            "username": "TestUser",
            "authorised": true,
            "reCo": "00",
            "responseText": "APPROVED",
            "authCode": "001543",
            "type": "purchase",
            "method": "card",
            "localTimeZone": "NZT",
            "dateTimeUtc": "2020-05-08T03:06:27Z",
            "dateTimeLocal": "2020-05-08T15:06:27+12:00",
            "settlementDate": "2020-05-08",
            "amount": "1.00",
            "balanceAmount": "0.00",
            "currency": "NZD",
            "currencyNumeric": 554,
            "clientType": "internet",
            "merchantReference": "1234ABC",
            "card": {
             "id": "0000120001291154",
             "cardHolderName": "JOHN T DOE",
             "cardNumber": "411111........11",
             "dateExpiryMonth": "05",
             "dateExpiryYear": "23",
             "type": "visa"
            },
            "cvc2ResultCode": "U",
            "storedCardIndicator": "single",
            "notificationUrl": "https://example.com/txn_result?123",
            "sessionId": "00001200030240010c9e7ceadd26a6d8",
            "isSurcharge": false,
            "liabilityIndicator": "standard",
            "links": [
             {
              "href": "https://sec.windcave.com/api/v1/transactions/0000000c01159507",
              "rel": "self",
              "method": "GET"
             },
             {
              "href": "https://sec.windcave.com/api/v1/sessions/00001200030240010c9e7ceadd26a6d8",
              "rel": "session",
              "method": "GET"
             },
             {
              "href": "https://sec.windcave.com/api/v1/transactions",
              "rel": "refund",
              "method": "POST"
             }
            ]
            }
           ]
          }
For more in-depth information on sending a query session request and processing the response please refer to the API reference documentation here.
HPP & 3D Secure
3D Secure allows merchants additional protection against fraudulent transactions by implementing further authentication for higher risk transactions and shifting liability from merchants to issuers.
The HPP solution supports 3D Secure, where supported by the acquirer. For further details about functionality and features, please see 3D Secure.
HPP 3D Secure Implementation
Implementing 3D Secure for HPP solutions requires your REST username be enabled for 3D Secure functionality. If you are unsure or would like to enquire about adding 3D Secure to your REST account, please contact us.
If 3D Secure has been enabled on your REST user, you simply need to follow the HPP Walkthrough process to initiate a payment. All 3D Secure actions will be handled with the cardholder on the HPP.
For further information on responses, please refer to 3D Secure.
To help increase chances of transactions meeting the frictionless flow merchants' criteria can include additional information about the payment in the Create Session request, for further information please refer to 3D Secure Optional Fields.
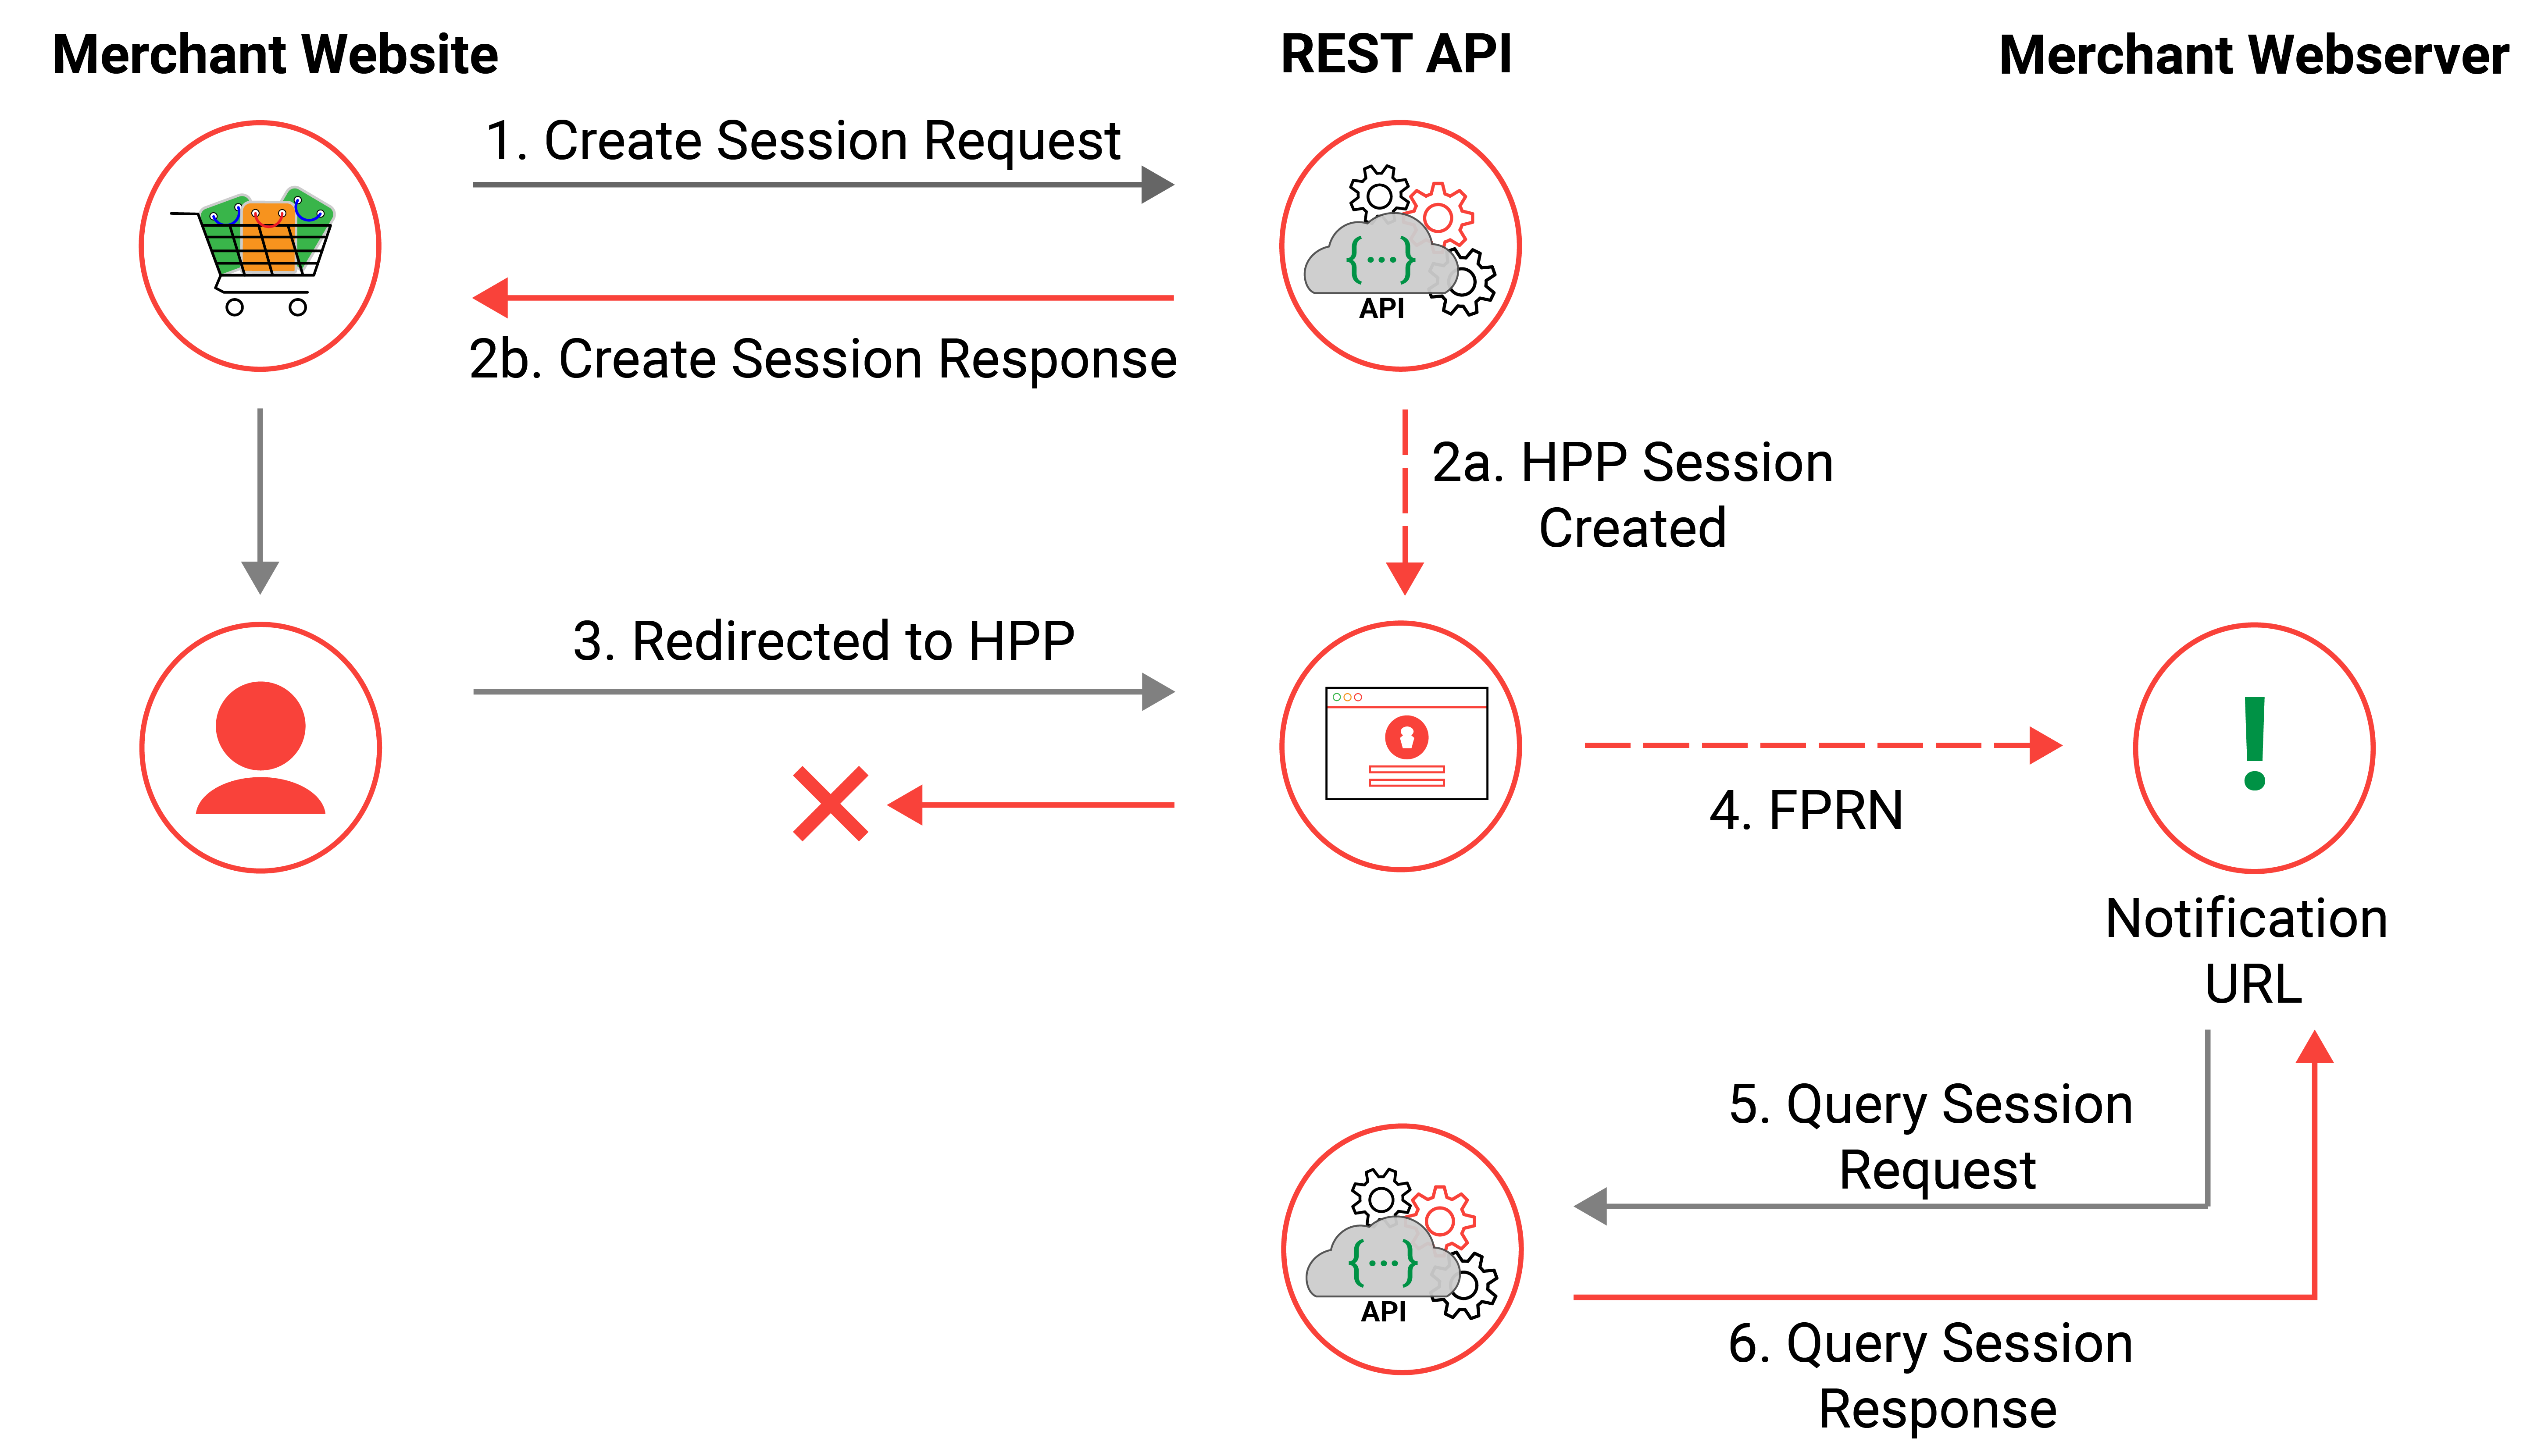
HPP & FPRN
Fail Proof Result Notification (FPRN) helps ensure the merchant web application receives the payment outcome in scenarios such as; the cardholder not returning to the merchant website due to browser being closed prior or the merchant web server being temporarily unavailable just prior to the transaction being processed.
The HPP solution supports FPRN and it is enabled by default for any new account setups, for further information please see Fail Proof Result Notification.
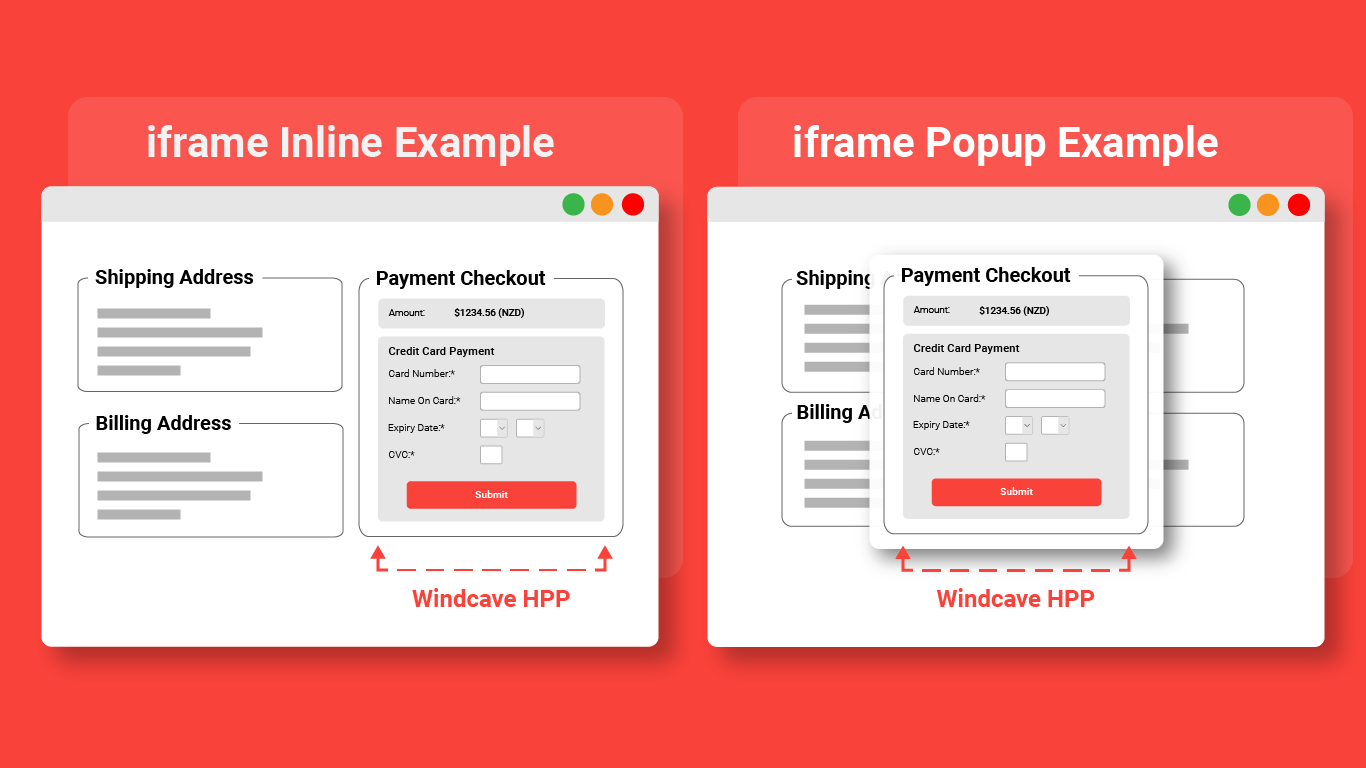
iframe Embedded HPP
Using an iframe allows the merchant website to embed another webpage within their page, embedding the Hosted Payment Page into an iframe provides a sense of comfort and familiarity to end users who may be uneasy about being redirected away from the merchant website.
The below image shows examples of iframe implementations:
Implementing iframes
As explained in the HPP Walkthrough process merchants should redirect to the URL returned in the create session response where "rel" is "hpp", for iframe implementations the merchant should instead load the same URL into a responsive iframe on their checkout payment page; this way the HPP is embedded within their own webpage.
Merchants can use the below sample code to create a responsive iframe in their webpage, setting the value for the src attribute to the URL returned in the create session response where "rel" is "hpp":
<iframe class=”responsive-iframe” src=”https://sec.windcave.com/pxmi3/EF4054F622D6C4C1B512FC9E81F547FA45A6ED23237FF3B236283493E38BF97630A40CC2F072621C2” scrolling=”auto” frameborder=”0”></iframe>
Breaking out of an iframe
After the payment process has been completed, the HPP will be redirected back to the merchant's website per the callbackUrls nominated in the create session request. The merchant webpage should expect and handle this scenario appropriately by breaking out of the iframe once the payment result has been received.
Below is a JavaScript code snippet that can be set on the merchant callback webpage to break out of an iframe, this will result in the top page being redirected the URL of the iframe which should be the callbackUrl nominated in the create session request:
          if (top.location != location) {
           top.location.href = document.location.href;
          }
iframe css
The CSS example below demonstrates how a merchant webpage can control the size of the iframe based on the user's screen size, this is achieved by utilizing media queries to create breakpoints for different screen sizes:
          /* Control the height of the iframe */
          .responsive-iframe {
           height: insert your value;
           width:100%;
          }
          /* Small devices (tablets, 768px and up) */
          @media (min-width: 768px) {
           .responsive-iframe {
            height: insert your value;
           }
          }


          /* Medium devices (desktops, 992px and up) */
          @media (min-width: 992px) {
           .responsive-iframe{
            height: insert your value;
           }
          }


          /* Large devices (large desktops, 1200px and up) */
          @media (min-width: 1200px) {
           .responsive-iframe {
            height: insert your value;
           }
          }
Paylink via API
Paylink allows merchants to request Windcave send a Hosted Payment Page (HPP) link directly to the user via email or SMS.
With support for 3D Secure the HPP provides merchants additional protection against chargebacks instead of processing MOTO (Mail Order Telephone Order) payments, reducing the risks and cost of accepting credit card payments.
Implementing Paylink via API
Implementing Paylink via API requires merchants to include the sessionDeliveryMethod field in the Create Session request; this indicates how the HPP link should be delivered to the user and can be set to either "email" or "sms".
Additionally merchants must include the customer object and either the email or phoneNumber field depending on the sessionDeliveryMethod used, these fields should be populated with the email address or phone number you would like the HPP link to be sent to.
Below is an example of a Create Session request where sessionDeliveryMethod is set to email:
Endpoint:
POST https://sec.windcave.com/api/v1/sessions
Headers:
          Content-Type:application/json
          Authorization: Basic ABC123
Request Body:
          {
            "amount": "1.00",
            "currency": "NZD",
            "merchantReference": "1234ABC",
            "type": "purchase",
            "sessionDeliveryMethod": "email",
            "callbackUrls": {
                "approved": "https://example.com/success",
                "declined": "https://example.com/fail",
                "cancelled": "https://example.com/cancel"
            },
            "notificationUrl": "https://example.com/txn_result?123",
            "customer":{
            "email": "[email protected]"
            }
          }
Below is an example of a Create Session request where sessionDeliveryMethod is set to sms:
Endpoint:
POST https://sec.windcave.com/api/v1/sessions
Headers:
          Content-Type:application/json
          Authorization: Basic ABC123
Request Body:
          {
              "type": "purchase",
              "amount": "1.00",
              "currency": "NZD",
              "merchantReference": "1234ABC",
              "sessionDeliveryMethod": "sms",
              "callbackUrls": {
                  "approved": "https://example.com/success",
                  "declined": "https://example.com/fail",
                  "cancelled": "https://example.com/cancel"
              },
              "notificationUrl": "https://example.com/txn_result?123",
              "customer":{
              "phoneNumber": "+64123456789"
              }
          }
Upon receiving a successful Create Session response the merchant web application should follow the standard HPP Walkthrough procedure with the exception that the user does not need to be redirected to the HPP page as this has been sent to the requested email or phone number.
Paylink Customization
Please see the Paylink Customization page for more information about how you can customize your Paylink user experience.
Drop-In
The Windcave Drop-In solution is a client-side JS library that allows merchants to construct the UI for accepting payments at their checkout page while maintaining PCI compliance for the interface.
This is a great solution for merchants looking to implement a simple pre-built payment UI into their checkout process.
For further information please refer to the Drop-In Integration Guide.
Hosted Fields
The Windcave Hosted Fields solution is a client-side JavaScript (JS) library which utilizes the AJAX POST to allow merchants to customize their checkout page's payment UI while keeping PCI compliance.
For further information please refer to the Hosted Fields Integration Guide.
Form Post
Please note this section is documented in terms of purchase transactions, however Auth/Complete and Validate transaction types are also supported in these examples.
The Merchant Hosted Payment Page (MHPP) form post integration utilizes a client side HTML form, the secure card data is securely posted from the cardholder's browser directly to the Windcave Host. With the MHPP form being hosted on the merchant's website it provides a merchant controlled UI experience for users.
This method may be preferred for merchants as there is no redirection for their customer, meaning they do not need to leave the merchant website to enter their payment details. This however will increase the PCI SAQ scope (SAQ A-EP) and this integration method is not supported by all acquirers, it is strongly recommended that you discuss with your chosen acquirer before proceeding with this integration method.
Form Post Walkthrough
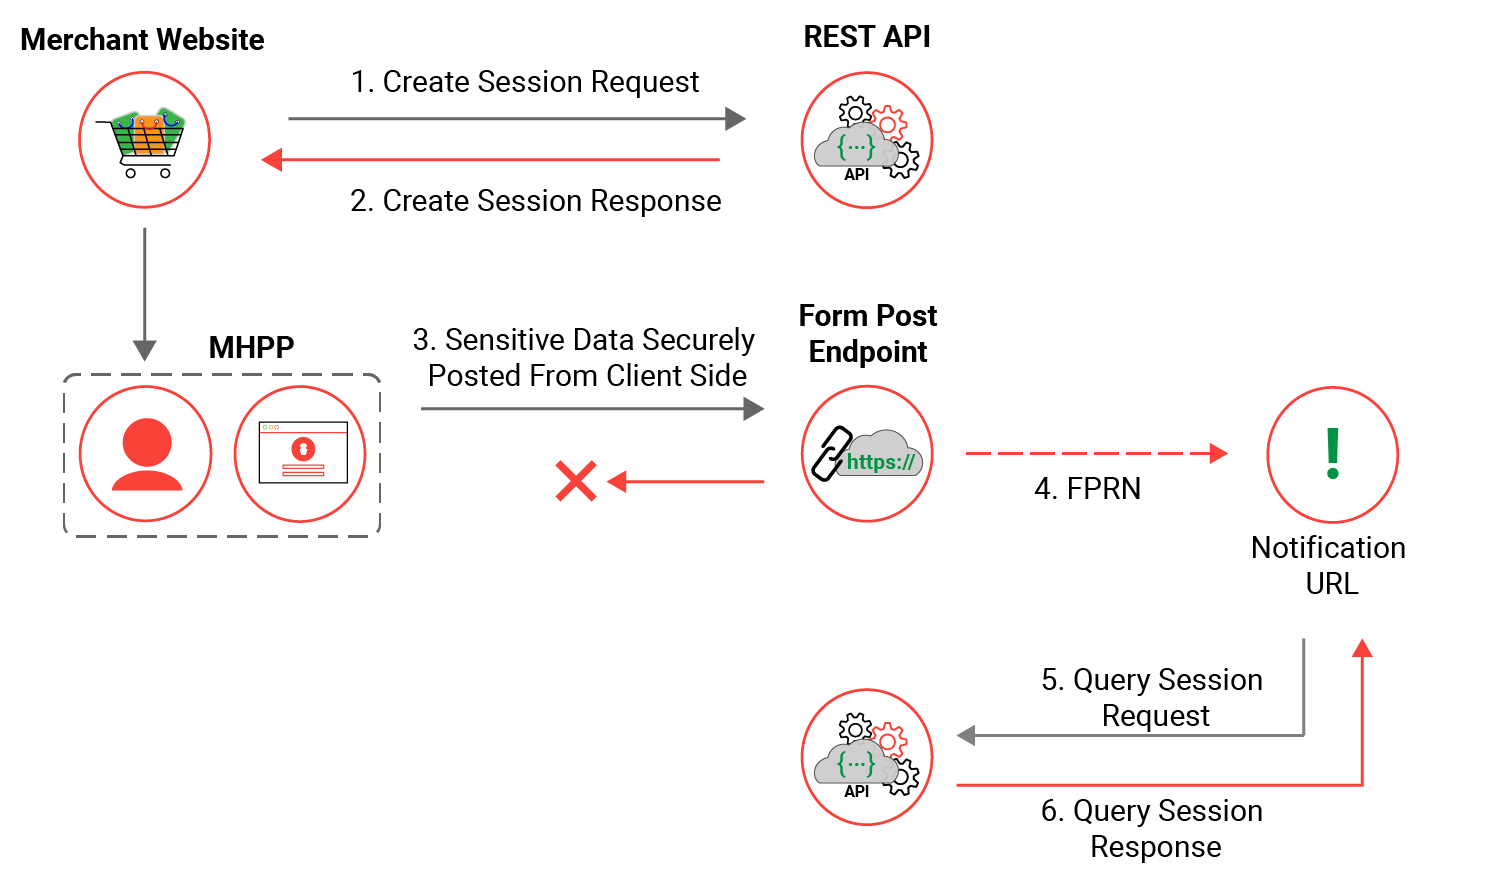
For merchants to be able to securely post their users sensitive payment information from the client side form directly to Windcave; a session is created in the Windcave host for each payment.
New sessions are created on request and triggered by the merchant web server sending a create session request, the newly created session will be given a session id which is used to reference the users payment.
The below flow diagram represents a high level Form Post transaction flow from start to finish, more in-depth information for each stage of the flow is detailed in the next section.
Creating a Session
In order to be able to securely post the users sensitive payment information the merchant webserver first needs to create a form post session.
This is achieved by the merchant webserver sending a create session request with the transaction specific information i.e. amount, currency, merchant reference and call back URL’s and merchant REST username and authentication. Below is an example of a simple create session request:
Endpoint:
POST https://sec.windcave.com/api/v1/sessions
Headers:
          Content-Type:application/json
          Authorization: Basic ABC123
Request Body:
          {
           "type": "purchase",
           "amount": "1.00",
           "currency": "NZD",
           "merchantReference": "1234ABC",
           "language": "en",
           "methods": ["card"],
           "callbackUrls": {
            "approved": "https://example.com/success",
            "declined": "https://example.com/fail",
            "cancelled": "https://example.com/cancel"
           },
           "notificationUrl": "https://example.com/txn_result?123"
          }
By default new sessions have a 72 hour timeout period, alternatively merchants can control when the session expires by using the expires field in the Create Session request.
For more in-depth information on sending a create session request and processing the response please refer to the API reference documentation here.
Extracting the URL
After creating a session the merchant webserver next needs a URL that the client side form can use to post the users sensitive payment information to process payment.
To achieve this the merchant webserver must read the URL link where “rel” is “submitCard” from the Create Session response. Below is an example of a simple create session response body and the “rel” as “submitCard” containing the URL :
HTTP Response Code:
202 Accepted
Response Body:
          {
           "id": "00001200030240010c9e7ceadd26a6d8",
           "state": "init",
           "links": [
            {
             "href": "https://sec.windcave.com/api/v1/sessions/00001200030240010c9e7ceadd26a6d8",
             "rel": "self",
             "method": "GET"
            },
            {
             "href": "https://sec.windcave.com/pxmi3/E494B52F483B328E3B259646A63FAF64AAC05E252FF87EB6A623D2C5817CA0B3C75B8B9176333D6EA",
             "rel": "submitCard",
             "method": "FORM_POST"
            }
           ]
          }
Also returned in the create session response is a URL that can be used in the query session request, this is read where the “rel” is “self” and is further detailed in the Obtaining the Transaction Result section.
For more in-depth information on sending a create session request and processing the response please refer to the API reference documentation here.
Rendering the Form
After requesting the MHPP session the merchant webserver next needs to be able to render the client side Merchant Hosted HTML form where customers can securely enter their payment details, this form must contain the below minimum required template of HTML form tag and input tag with the same name attribute:
          <form method="post" enctype="multipart/form-data" action=" INSERT HREF VALUE HERE ">
          <input type="text" name="CardNumber"  minlength="14" maxlength="16" />
          <input type="text" name="CardHolderName"             maxlength="64"/>
          <input type="text" name="ExpiryMonth" minlength="2" maxlength="2"  />
          <input type="text" name="ExpiryYear"  minlength="2" maxlength="2"  />
          <input type="text" name="Cvc2"        minlength="3" maxlength="4" />
          <input type="submit" value="Submit" />
          </form>
Note: The merchant website should include client side validation on each card form field, especially validating CardNumber with a standard Luhn Check using standard JavaScript. Also including a basic future expiry date and CVC digits length check.
Entering Payment Information
The merchant webserver should now be presenting a HTML client side form to the user to enter their payment details into, the user will check all details i.e. amount and reference are correct before entering their sensitive payment information.
As this is a client side form the merchant webserver is not to have access to any of the data populated in these fields.
Post Form Data
After entering all their payment details the user clicks the submit button on the client side form, this should trigger the client side to securely post the sensitive payment data to the Windcave host directly using the HREF value entered into the HTML form.
Once received the Windcave host processes the transaction via the merchant's acquirer to the payment schemes.
Redirecting Customer to Callback URL
After completing all processing of the transaction the Windcave host will redirect the user to the Approved/Declined/Cancelled callback URL nominated in the create session request by the merchant webserver.
Appended to the Approved/Declined/Cancelled callback URL will be the session id, here the merchant webserver will capture this session id before proceeding to the next stage.
Below is an example of the URL where the customer was redirected to the approved callback URL specified in the create session request.
https://example.com/success?sessionId=00001200030240010c9e7ceadd26a6d8
Obtaining the Transaction Result
The merchant webserver now needs to obtain the result of the transaction to update its internal order system etc.
Upon receiving a response to any of the callback URLs the merchant webserver should extract the sessionId value, then submit a query session request to obtain the transaction result. Below is an example of the query session HTTPS GET request:
Endpoint:
GET https://sec.windcave.com/api/v1/sessions/00001200030240010c9e7ceadd26a6d8
Headers:
          Content-Type:application/json
          Authorization: Basic ABC123
The response returned from the REST API contains the result of the specified session, this includes all transaction attempts made during the session. The merchant webserver must read the “authorised” attribute of the 0th transaction to determine the final result of the session, if true is returned the payment has been successfully authorized otherwise false will be returned to indicate payment has not been authorized.
Depending on individual merchant requirements additional details should be read and used to update the merchants internal order system. Below is a simple example of the query session response:
HTTP Response Code:
200 OK
Response Body:
          {
           "id": "00001200030240010c9e7ceadd26a6d8",
           "state": "complete",
           "type": "purchase",
           "amount": "1.00",
           "currency": "NZD",
           "currencyNumeric": 554,
           "merchantReference": "1234ABC",
           "expires": "2020-05-11T03:06:07Z",
           "storedCardIndicator": "single",
           "callbackUrls": {
            "approved": "https://example.com/success",
            "declined": "https://example.com/fail",
            "cancelled": "https://example.com/cancel"
           },
           "notificationUrl": "https://example.com/txn_result?123",
           "storeCard": true,
           "clientType": "internet",
           "methods": ["card"],
           "links": [
            {
             "href": "https://sec.windcave.com/api/v1/sessions/00001200030240010c9e7ceadd26a6d8",
             "rel": "self",
             "method": "GET"
            },
            {
             "href": "https://sec.windcave.com/api/v1/transactions/0000000c01159507",
             "rel": "transaction",
             "method": "GET"
            }
           ],
           "transactions": [
            {
             "id": "0000000c01159507",
             "username": "TestUser",
             "authorised": true,
             "reCo": "00",
             "responseText": "APPROVED",
             "authCode": "001543",
             "type": "purchase",
             "method": "card",
             "localTimeZone": "NZT",
             "dateTimeUtc": "2020-05-08T03:06:27Z",
             "dateTimeLocal": "2020-05-08T15:06:27+12:00",
             "settlementDate": "2020-05-08",
             "amount": "1.00",
             "balanceAmount": "0.00",
             "currency": "NZD",
             "currencyNumeric": 554,
             "clientType": "internet",
             "merchantReference": "1234ABC",
             "card": {
              "id": "0000120001291154",
              "cardHolderName": "JOHN T DOE",
              "cardNumber": "411111........11",
              "dateExpiryMonth": "05",
              "dateExpiryYear": "23",
              "type": "visa"
             },
             "cvc2ResultCode": "U",
             "storedCardIndicator": "single",
             "notificationUrl": "https://example.com/txn_result?123",
             "sessionId": "00001200030240010c9e7ceadd26a6d8",
             "isSurcharge": false,
             "liabilityIndicator": "standard",
             "links": [
             {
               "href": "https://sec.windcave.com/api/v1/transactions/0000000c01159507",
               "rel": "self",
               "method": "GET"
              },
              {
               "href": "https://sec.windcave.com/api/v1/sessions/00001200030240010c9e7ceadd26a6d8",
               "rel": "session",
               "method": "GET"
              },
              {
               "href": "https://sec.windcave.com/api/v1/transactions",
               "rel": "refund",
               "method": "POST"
              }
             ]
            }
           ]
          }
For more in-depth information on sending a query session request and processing the response please refer to the API reference documentation here.
Form Post & 3D Secure
3D Secure allows merchants additional protection against fraudulent transactions by implementing further authentication for higher risk transactions and shifting liability from merchants to issuers.
The Form Post solution supports 3D Secure, where supported by the acquirer. For further details about functionality and features, please see 3D Secure.
Form Post 3D Secure Implementation
Implementing 3D Secure for Form post solutions requires your REST username be enabled for 3D Secure functionality. if you are unsure or would like to enquire about adding 3D Secure to your REST account please contact us.
If 3D Secure has been enabled on your REST user, you simply need to follow the Form Post Walkthrough process to initiate payment. All 3D Secure required actions will be handled by the Windcave host with the cardholder once the client-side form has been submitted.
For further information on the responses, please see 3D Secure.
To help increase the chances of transactions meeting the frictionless flow criteria merchants can include additional information about the payment in the Create Session request. For more information, please refer to 3D Secure Optional Fields.
Form Post & FPRN
Fail Proof Result Notification (FPRN) helps ensure the merchant web application receives the payment outcome in scenarios such as; the cardholder not returning to the merchant website due to browser being closed prior or the merchant webserver being temporarily unavailable just prior to the transaction being processed.
The Form Post solution supports FPRN and it is enabled by default for any new account setups, for further information please see Fail Proof Result Notification.
AJAX Post
Please note this section is documented in terms of purchase transactions, however Auth/Complete and Validate transaction types are also supported in these examples.
The Merchant Hosted Payment Page (MHPP) AJAX post integration utilizes a client-side form, the secure card data is securely posted from the cardholder's browser directly to the Windcave Host. With the MHPP form being hosted on the merchant's website it allows merchants to offer a more native payment page experience.
AJAX or Asynchronous JavaScript and XML involves the loading of data in the background and displaying it on the webpage without reloading the whole page, for more information about AJAX you can refer to https://www.w3schools.com/jquery/jquery_ajax_intro.asp.
This method may be preferred for merchants as there is no redirection for their customer, meaning they do not need to leave the merchant website to enter their payment details. This however will increase the PCI SAQ scope (SAQ A-EP) and this integration method is not supported by all acquirers, it is strongly recommended that you discuss with your chosen acquirer before proceeding with this integration method.
AJAX Post Walkthrough
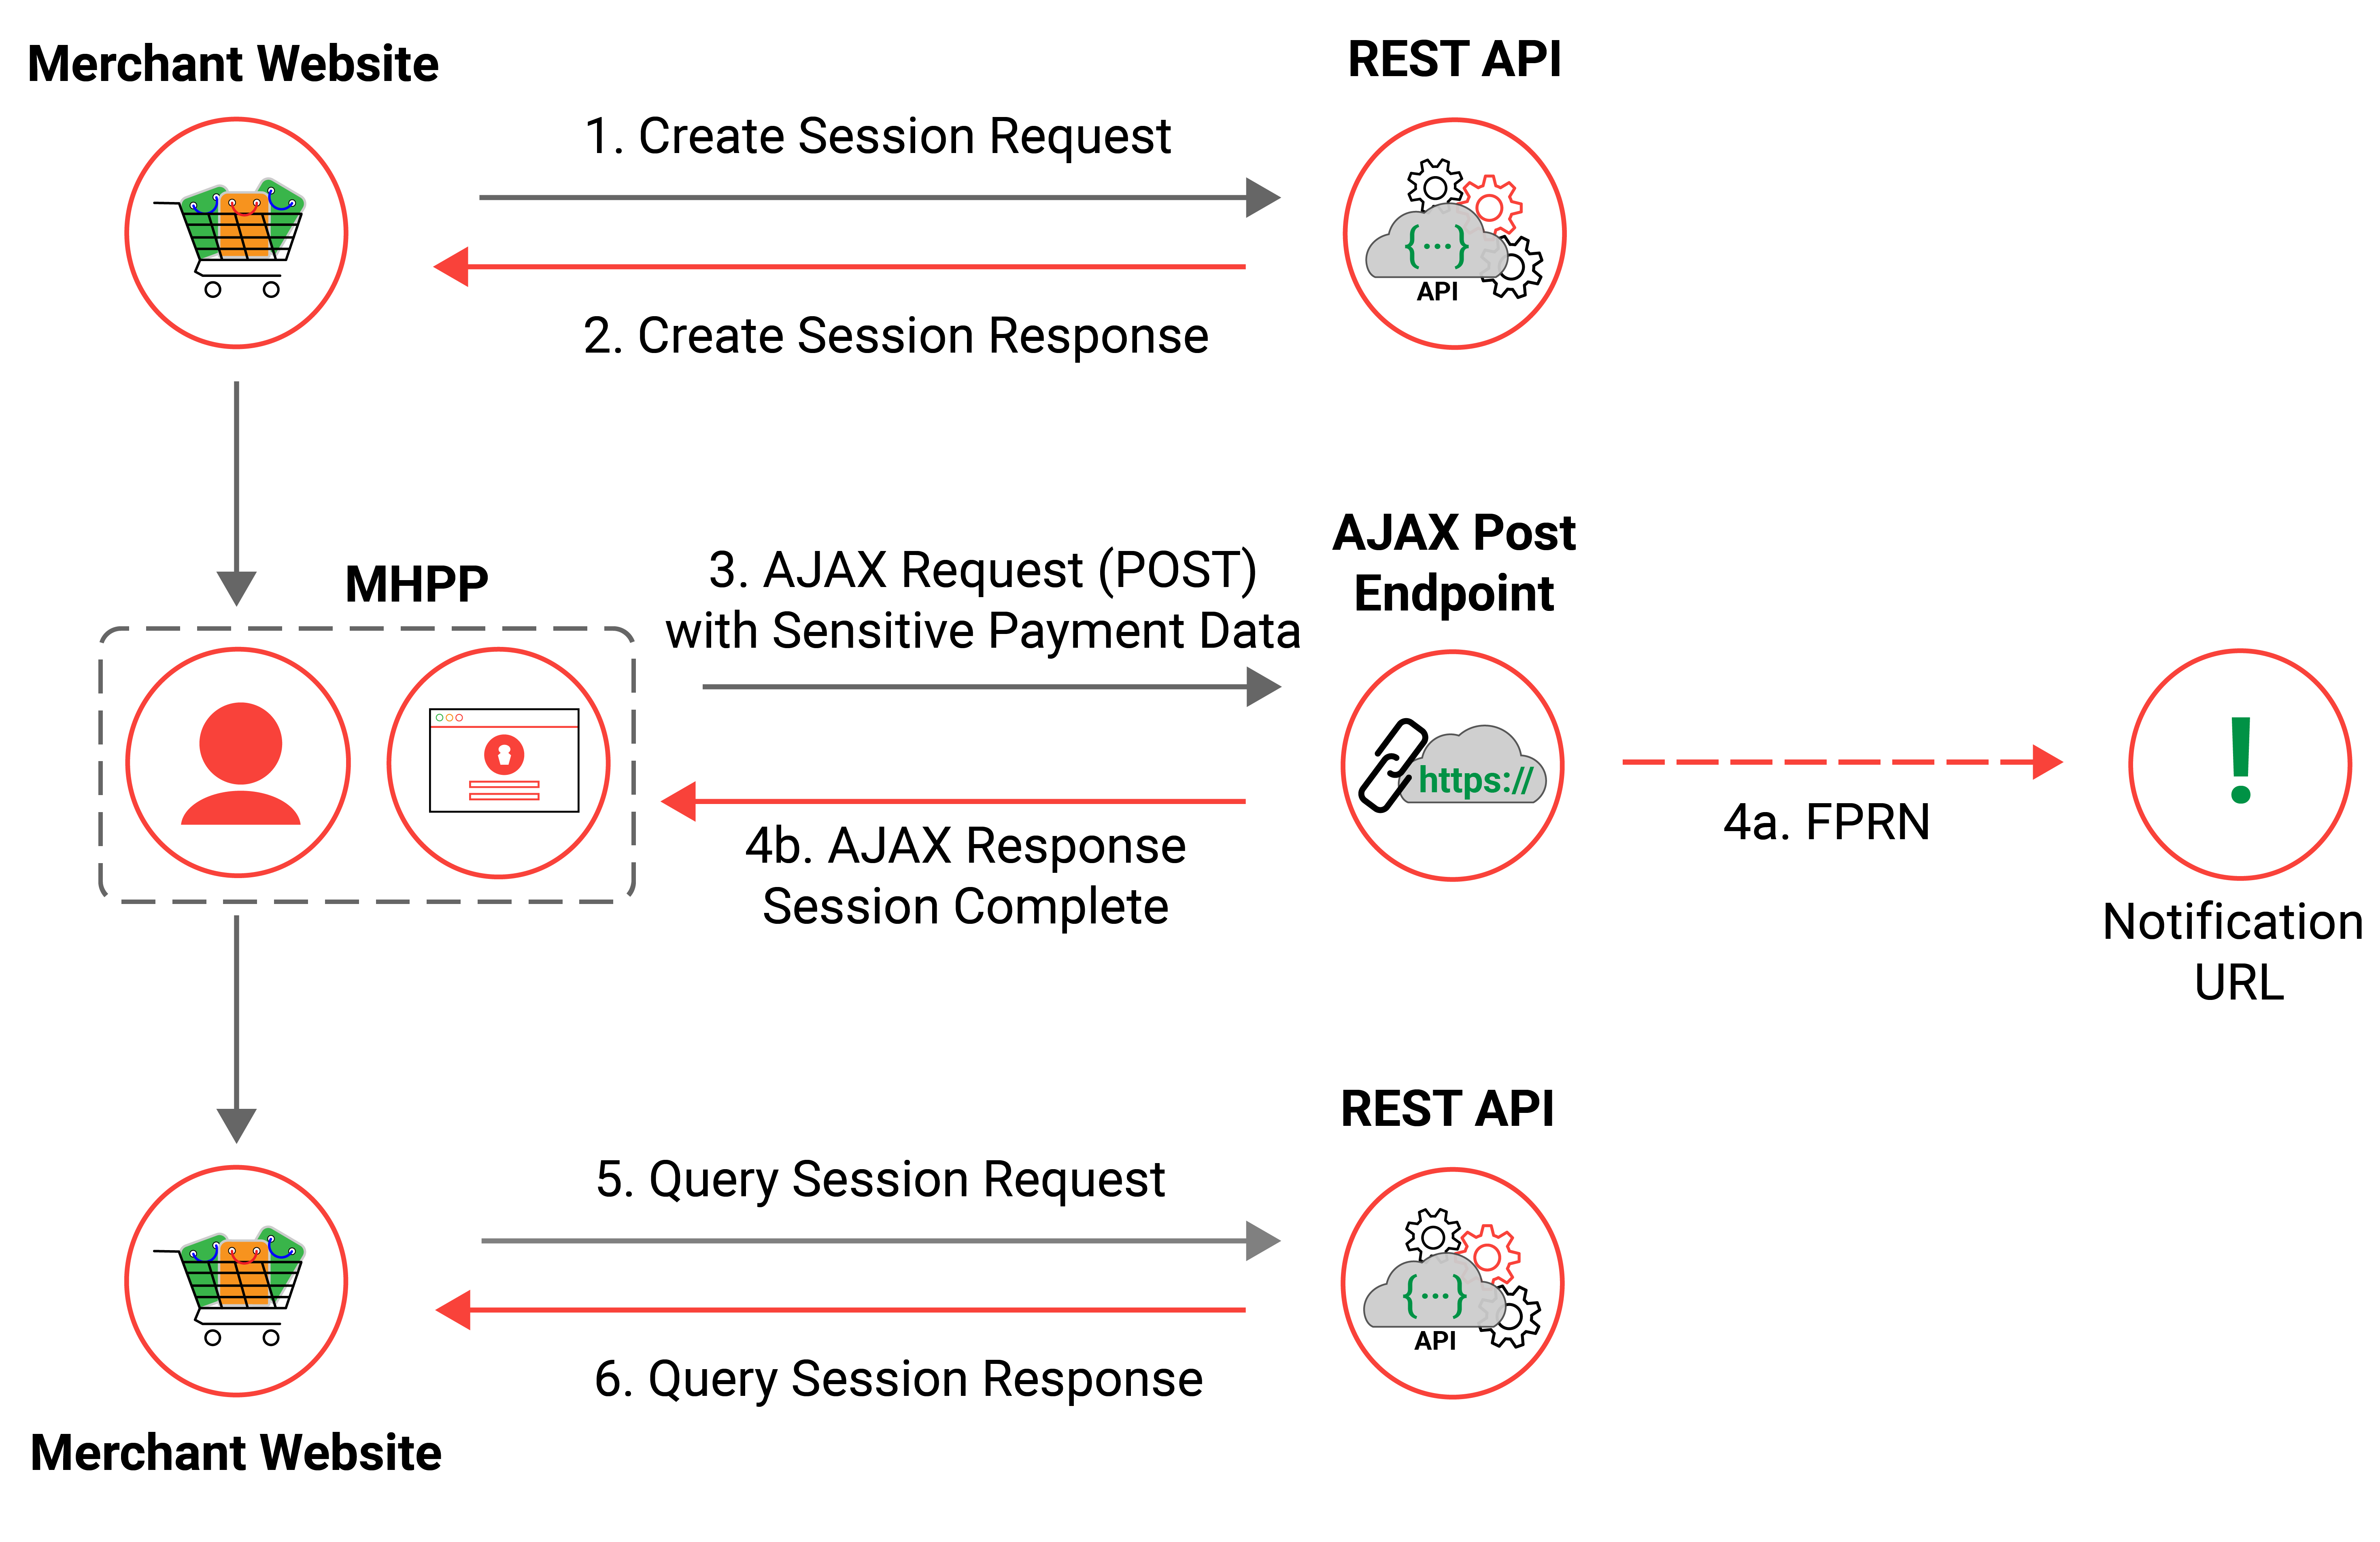
The below flow diagram represents a high-level AJAX Post transaction flow from start to finish, more in-depth information for each stage of the flow is detailed in the next section.
Creating a Session
In order to be able to securely post the users sensitive payment information the merchant web server first needs to create an AJAX POST session; this is achieved by the merchant web server sending a create session request.
Below is an example of a simple create session request:
Endpoint:
POST https://sec.windcave.com/api/v1/sessions
Headers:
          Content-Type:application/json
          Authorization: Basic ABC123
Request Body:
          {
           "type": "purchase",
           "amount": "1.00",
           "currency": "NZD",
           "merchantReference": "1234ABC",
           "language": "en",
           "methods": ["card"],
           "callbackUrls": {
            "approved": "https://example.com/success",
            "declined": "https://example.com/fail",
            "cancelled": "https://example.com/cancel"
           },
           "notificationUrl": "https://example.com/txn_result?123"
          }
For more in-depth information on sending a create session request and processing the response please refer to the API reference documentation.
Handling the Session Response
Upon receiving the create session response the merchant web server must extract the URL link where "rel" is "ajaxSubmitCard", this URL must be stored for use in the AJAX POST action when submitting payment details.
Additionally, the merchant web server must extract the unique session id from the id field in the response, this should be retained and associated with your own cart session; merchants must ensure the session Id referenced is always the Id expected for the current cart session.
Below is an example of a simple create session response:
HTTP Response Code:
202 Accepted
Response Body:
          {
           "id": "00001200030240010c9e7ceadd26a6d8",
           "state": "init",
           "links": [
            {
             "href": "https://sec.windcave.com/api/v1/sessions/00001200030240010c9e7ceadd26a6d8",
             "rel": "self",
             "method": "GET"
            },
            {
             "href": "https://sec.windcave.com/mh/E1D1D31611F02E8BC13676A3B745A14FC850CB6CE344120667D8A6C095D1A395F8D05253B14C4C4EC",
             "rel": "ajaxSubmitCard",
             "method": "AJAX_POST"
            }
           ]
          }
For more in-depth information on processing the response please refer to the API reference documentation.
Rendering the MHPP
A MHPP client-side payment form must be rendered to allow the cardholder to enter their payments details, how the MHPP is rendered is the responsibility of the merchant however the below fields must be included at a minimum:
- cardholderName
- cardNumber
- dateExpiryMonth
- dateExpiryYear
- cvc2
It is recommended that client-side validation such as performing a Luhn check to validate the cardNumber field, basic future expiry date check and CVC digit length check be performed before submitting the data to the Windcave host.
AJAX Request (POST)
Upon MHPP submission trigger an AJAX POST request is sent to the AJAX Post endpoint (ajaxSubmitCard URL), the body of the request is in JSON format with a card object containing the payment details entered into the MHPP form.
Below is an example of the AJAX POST request:
Endpoint:
POST https://sec.windcave.com/mh/E1D1D31611F02E8BC13676A3B745A14FC850CB6CE344120667D8A6C095D1A395F8D05253B14C4C4EC
Headers:
Content-Type:application/json
Request Body:
          {
           "card": {
            "cardHolderName": "JOHN T DOE",
            "cardNumber": "4111111111111111",
            "dateExpiryMonth": "01",
            "dateExpiryYear": "18",
            "cvc2": "111"
           }
          }
Once received the Windcave host processes the transaction via the merchant's acquirer to the payment schemes.
Handling the AJAX Response
Upon receiving a response, the merchants AJAX must ensure the response is for the current cart session, this is done by comparing the id value returned to that stored from the create session response.
Please note if the appropriate callbackUrls were populated in the create session request this will also be returned in the response, merchants can choose to redirect the page to the link where "rel" is "done" however this is optional.
Below is an example of an AJAX Response:
HTTP Response Code:
200 OK
Response Body:
          {
           "id": "00001200036244160cd3eed722903bc5",
           "links": [
            {
             "href": "https://example.com/success?sessionId=00001200036244160cd3eed722903bc5",
             "rel": "done",
             "method": "REDIRECT"
            }
           ]
          }
Obtaining the Transaction Result
To obtain the result of the transaction the merchant web server must submit a query session request using the id stored from the create session response.
Below is an example of a query session request:
Endpoint:
GET https://sec.windcave.com/api/v1/sessions/00001200030240010c9e7ceadd26a6d8
Headers:
          Content-Type:application/json
          Authorization: Basic ABC123
The response to the query session request includes all transaction attempts during the specified session, the merchant web server must read the “authorised” attribute of the 0th transaction to determine the final result of the session; if true is returned the payment has been successfully authorized otherwise false will be returned and indicates the payment has not been authorized.
Optionally merchants may read and use additional details in the response to update their internal order system.
Below is a simple example of the query session response:
HTTP Response Code:
200 OK
Response Body:
          {
           "id": "00001200030240010c9e7ceadd26a6d8",
           "state": "complete",
           "type": "purchase",
           "amount": "1.00",
           "currency": "NZD",
           "currencyNumeric": 554,
           "merchantReference": "1234ABC",
           "expires": "2020-05-11T03:06:07Z",
           "storedCardIndicator": "single",
           "callbackUrls": {
            "approved": "https://example.com/success",
            "declined": "https://example.com/fail",
            "cancelled": "https://example.com/cancel"
           },
           "notificationUrl": "https://example.com/txn_result?123",
           "storeCard": true,
           "clientType": "internet",
           "methods": ["card"],
           "links": [
            {
             "href": "https://sec.windcave.com/api/v1/sessions/00001200030240010c9e7ceadd26a6d8",
             "rel": "self",
             "method": "GET"
            },
            {
             "href": "https://sec.windcave.com/api/v1/transactions/0000000c01159507",
             "rel": "transaction",
             "method": "GET"
            }
           ],
           "transactions": [
            {
             "id": "0000000c01159507",
             "username": "TestUser",
             "authorised": true,
             "reCo": "00",
             "responseText": "APPROVED",
             "authCode": "001543",
             "type": "purchase",
             "method": "card",
             "localTimeZone": "NZT",
             "dateTimeUtc": "2020-05-08T03:06:27Z",
             "dateTimeLocal": "2020-05-08T15:06:27+12:00",
             "settlementDate": "2020-05-08",
             "amount": "1.00",
             "balanceAmount": "0.00",
             "currency": "NZD",
             "currencyNumeric": 554,
             "clientType": "internet",
             "merchantReference": "1234ABC",
             "card": {
              "id": "0000120001291154",
              "cardHolderName": "JOHN T DOE",
              "cardNumber": "411111........11",
              "dateExpiryMonth": "01",
              "dateExpiryYear": "23",
              "type": "visa"
             },
             "cvc2ResultCode": "U",
             "storedCardIndicator": "single",
             "notificationUrl": "https://example.com/txn_result?123",
             "sessionId": "00001200030240010c9e7ceadd26a6d8",
             "liabilityIndicator": "standard",
             "links": [
              {
               "href": "https://sec.windcave.com/api/v1/transactions/0000000c01159507",
               "rel": "self",
               "method": "GET"
              },
              {
               "href": "https://sec.windcave.com/api/v1/sessions/00001200030240010c9e7ceadd26a6d8",
               "rel": "session",
               "method": "GET"
              },
              {
               "href": "https://sec.windcave.com/api/v1/transactions",
               "rel": "refund",
               "method": "POST"
              }
            ]
            }
           ]
          }
For more in-depth information on sending a query session request and processing the response please refer to the API reference documentation.
AJAX Post & 3D Secure
3D Secure allows merchants additional protection against fraudulent transactions by implementing further authentication for higher risk transactions and shifting the liability from merchants to issuers.
The AJAX Post solution supports 3D Secure, where supported by the acquirer, for further details about functionality and features, please see 3D Secure.
AJAX Post 3D Secure Implementation
Implementing 3D Secure for AJAX Post solutions requires your REST username be enabled for 3D Secure functionality, if you are unsure or would like to enquire about adding 3D Secure to your REST account please contact us.
If 3D Secure has been enabled on your REST user you simply need to follow the AJAX Post Walkthrough process to initiate payment, any 3D Secure required actions will be returned once the client-side form has been posted.
If 3D Secure is required the merchant webserver will receive the below response with “rel” as “3DSecure”, the merchant webserver must extract and redirect the cardholder to the URL provided in the response:
Response Code:
200 OK
Response Body:
          {
                "id": "00001200051135660cfeb60f8b57bf6d",
                "links": [
                      {
                            "href": "https://sec.windcave.com/pxmi3/F1380F851DF6FF971A55B79DFCCCD4ECE5EB69B0ACEE43397D5EB2374E9E5AABB211EC1E2F3D0BF7C6ABC66E806D7CFBF",
                            "rel": "3DSecure",
                            "method": "REDIRECT"
                      }
                ],
          }
Once redirected the Windcave hosted 3D Secure URL will handle any 3D Secure actions with the cardholder, for further information please refer to Browser-Based Authentication.
Once all 3D secure requirements have been completed, the user is automatically redirected to the callback URLs specified in the Create Session request with a sessionId parameter in the URL.
Below is an example of the URL where the customer was redirected to the approved callback URL specified in the Create Session request.
https://example.com/success?sessionId=00001200030240010c9e7ceadd26a6d8
To help increase chances of transactions meeting the frictionless flow criteria merchants can include additional information about the payment in the Create Session request, for further information and responses please refer to 3D Secure Optional Fields.
AJAX Post & FPRN
Fail Proof Result Notification (FPRN) helps ensure the merchant web application receives the payment outcome in scenarios such as; the cardholder prematurely closes the merchant website or the merchant webserver being temporarily unavailable just prior to the transaction being processed.
The AJAX Post solution supports FPRN and it is enabled by default for any new account setups, for further information please see Fail Proof Result Notification.
Server Side Post
Please note this section is documented in terms of purchase transactions, however Auth/Complete and Validate transaction types are also supported in these examples.
The Merchant Hosted Payment Page (MHPP) server side post integration utilizes a server side form, the secure card data is posted from the merchant webserver directly to the Windcave host. As the MHPP is hosted on the merchant's website it allows merchants to offer a fully native payment page experience.
This method may be preferred for some merchants as the fully native payment page provides further control and capture of full card details. This however will increase the PCI SAQ scope (SAQ D) and this integration method is not supported by all acquirers, it is strongly recommended that you discuss with your chosen acquirer before proceeding with this integration method.
Please note merchants may be requested to provide their PCI-DSS Attestation of Compliance (AOC) to Windcave before proceeding with integrating to this method, a Non-Disclosure Agreement (NDA) may be put in place prior to sharing the PCI-DSS AOC.
Server Side Walkthrough
The below flow diagram represents a high level server side post transaction flow from start to finish, more in-depth information for each stage of the flow is detailed in the next section.
Capturing Payment Information
In order to process payment the merchant webserver first needs to securely capture the customer's sensitive payment information, this is handled by the merchant but should meet PCI-DSS security standards to ensure customer's data is safe.
Create Transaction Request
In order to process payment for the user the merchant webserver must securely post the payment details to the Windcave host, this is achieved by submitting a Create Transaction request via the REST API. Below is an example of a simple create transaction request:
Endpoint:
POST https://sec.windcave.com/api/v1/transactions
Headers:
          Content-Type:application/json
          Authorization: Basic ABC123
Request Body:
          {
           "type": "purchase",
           "amount": "12.34",
           "currency": "NZD",
           "merchantReference": "1234ABC",
           "card": {
            "cardHolderName": "JOHN T DOE",
            "cardNumber": "4111111111111111",
            "dateExpiryMonth": "01",
            "dateExpiryYear": "22",
            "cvc2": "111"
           }
          }
After sending the payment request the merchant webserver needs to obtain the transaction result so that the customer can be alerted of the outcome of their transaction.
In order to obtain the transaction result the merchant webserver needs to parse the create transaction response for the authorised field, this field will indicate true if the transaction was approved or false if the transaction was declined. Below is an example of a simple create transaction response:
HTTP Response Code:
201 Created
Response Body:
          {
           "id": "0000000c01541fe6",
           "username": "TestUser",
           "authorised": true,
           "allowRetry": false,
           "reCo": "00",
           "responseText": "APPROVED",
           "authCode": "011744",
           "type": "purchase",
           "method": "card",
           "localTimeZone": "NZT",
           "dateTimeUtc": "2020-07-02T02:18:26Z",
           "dateTimeLocal": "2020-07-02T14:18:26+12:00",
           "settlementDate": "2020-07-02",
           "amount": "12.34",
           "currency": "NZD",
           "currencyNumeric": 554,
           "clientType": "internet",
           "merchantReference": "1234ABC",
           "card": {
            "cardHolderName": "JOHN T DOE",
            "cardNumber": "411111........11",
            "dateExpiryMonth": "01",
            "dateExpiryYear": "22",
            "type": "visa"
           },
           "cvc2ResultCode": "U",
           "links": [
            {
             "href": "https://sec.windcave.com/api/v1/transactions/0000000c01541fe6",
             "rel": "self",
             "method": "GET"
            },
            {
             "href": "https://sec.windcave.com/api/v1/transactions",
             "rel": "refund",
             "method": "POST"
            }
           ]
          }
In the event the transaction is still being processed by the parties involved the REST API will respond to the merchant webserver 10 seconds after the initial request was received, this ensures the merchant webserver has confirmation the request was received and has a means of checking the result once the transaction has been processed. Below is an example of a simple create transaction response where the transaction was not processed within the 10 seconds:
HTTP Response Code:
202 Accepted
Response Body:
          {
           "id": "0000000c015257e1",
           "links": [
            {
             "href": "https://sec.windcave.com/api/v1/transactions/0000000c015257e1",
             "rel": "self",
             "method": "GET"
            }
           ]
          }
Once received the merchant webserver can periodically submit the query transaction request by reading the URL link where “rel” is “self”, the query transaction response will return a HTTP 202 Accepted response if the transaction is still being processed.
The query transaction response will return a HTTP 200 OK response if the transaction has finished processing. Below is an example of a query transaction response where the transaction has been processed:
HTTP Response Code:
200 OK
Response Body:
          {
           "id": "0000000c01541fe6",
           "username": "TestUser",
           "authorised": true,
           "allowRetry": false,
           "reCo": "00",
           "responseText": "APPROVED",
           "authCode": "011744",
           "type": "purchase",
           "method": "card",
           "localTimeZone": "NZT",
           "dateTimeUtc": "2020-07-02T02:18:26Z",
           "dateTimeLocal": "2020-07-02T14:18:26+12:00",
           "settlementDate": "2020-07-02",
           "amount": "12.34",
           "currency": "NZD",
           "currencyNumeric": 554,
           "clientType": "internet",
           "merchantReference": "1234ABC",
           "card": {
            "cardHolderName": "JOHN T DOE",
            "cardNumber": "411111........11",
            "dateExpiryMonth": "01",
            "dateExpiryYear": "22",
            "type": "visa"
           },
           "cvc2ResultCode": "U",
           "links": [
            {
             "href": "https://sec.windcave.com/api/v1/transactions/0000000c01541fe6",
             "rel": "self",
             "method": "GET"
            },
            {
             "href": "https://sec.windcave.com/api/v1/transactions",
             "rel": "refund",
             "method": "POST"
            }
           ]
          }
In order to obtain the transaction result the merchant webserver needs to parse the query transaction response for the authorised field, this field will indicate true if the transaction was approved or false if the transaction was declined.
For more in-depth information on sending a create transaction request and processing the response please refer to the API reference documentation here.
Displaying The Transaction Result
After discovering the result of the transaction the merchant webserver is required to display the transaction result to the user, this can be done by simply redirecting the user to a success/failure page indicating the result of the payment but how this is managed is entirely up to the merchant's webserver.
Server Side Post & 3D Secure
Windcave is certified for Server Side Post 3D Secure with the 3RI (3DS Requestor Initiated) type of authentication, where transactions proceed without the customer’s direct involvement. 3RI is essentially back-end rebilling that follows a prior authentication via a front-end Customer Initiated Transaction (CIT) (i.e. 3DS authentication on a website, loading card onto an app etc).
Note: For 3RI to be allowed, there must have been a prior CIT authentication per scheme requirements, which is currently only supported with Windcave's Create Session solution.
Also known as Merchant-Initiated Authentication, 3RI enables seamless authentication methods such as Frictionless authentication or Decoupled authentication, where supported by the issuer/ACS.
For Frictionless flows, transactions are processed without customer interaction, while Decoupled authentication requires merchants to manage interim responses and actively poll for the final outcome to complete the transaction.
For more information, see Frictionless flows and Decoupled Authentication.
For more information about 3D Secure please see the 3D Secure section of this guide.
Server Side Post & FPRN
Fail Proof Result Notification (FPRN) helps ensure the merchant web application receives the payment outcome in scenarios such as; the merchant webserver being temporarily unavailable just prior to the transaction being processed.
The Server-Side Post solution supports FPRN and it is enabled by default for any new account setups, for further information please see Fail Proof Result Notification.
3D Secure
3D Secure (3DS) adds an additional level of authentication to help protect against fraudulent transactions by shifting liability to the issuing bank. This additional authentication may not require input from the cardholder, however when additional input is required the cardholder will typically be redirected to their issuers 3D Secure user interface; here the cardholder will be prompted to authenticate that they are the owner of the account.
The information required to authenticate the transaction will vary between different issuers, for example, approving via your banking / issuer mobile app, or an SMS code to the cardholder's registered mobile device.
Please note the 3D Secure authentication interface displayed to the cardholder is controlled by the individual issuers and cannot be customized by the merchant.
3D Secure is mandated by some acquirers, Windcave acquiring does mandate 3D Secure be enabled unless special dispensation is granted.
3D Secure v2
3D Secure version 1 was launched in 2001 to protect businesses and their customers from fraud. A re-direct to an authentication page with a password or code ensured a secure payment method before approving a purchase.
Due to the changes in the way that a customer makes online purchases, the expectations of a secure and frictionless experience have increased, and 3D Secure version 2 was introduced to meet these requirements.
3D Secure v2 aims to reduce the friction of authentication associated with its predecessor (3D Secure v1), by increasing data sharing between merchants and card issuers in a non-intrusive way and supporting modern authentication methods such as two-factor authentication (SMS and biometrics).
3D Secure v2 provides Strong Customer Authentication (SCA) compliant with European PSD2 regulations, for further information please see Strong Customer Authentication.
Liability Shift
Shifting liability from merchants to the card issuing banks is one of the key incentives provided to merchants for 3D Secure authenticated transactions, this is possible because of the additional authentication/checks done when processing 3D Secure transactions.
Please note the 3D Secure liability shift only affects fraudulent chargeback requests, there are other chargeback requests that are not applicable to the 3D Secure liability shift.
This liability shift is only applicable to the transaction where the 3DS validation checks were performed.
Merchants with 3D Secure enabled on their REST API user can review the liability shift status for each transaction, this is done by extracting the value of the liabilityIndicator field returned in the final payment response.
Merchants should not develop any conditional logic based on the liabilityIndicator field; this field is intended for reporting purposes only. If the liabilityIndicator is set to “Standard” this indicates no liability shift has taken place and standard liability applies, alternatively if 3D Secure has been successfully authenticated the liabilityIndicator value will be set to the appropriate value based on the liability shift.
Below is the set of values the merchant can expect for liabilityindicator:
- standard
- 3ds2frictionless
- 3ds2challenge
- 3ds2decoupled
3D Secure Authentication
With 3D Secure merchants have access to utilize browser-based authentication with pages better optimized for mobile support.
All 3D Secure authentication channels have Frictionless and Challenge based user experience, please refer to Frictionless vs Challenge for further information.
Browser-Based Authentication
Browser-based authentication embeds the 3D Secure challenge into an iFrame.
For HPP, this iFrame is located in the payment checkout so to the cardholder it appears as though they have not left the payment page. This increases cardholder confidence and aims to help reduce shopping cart abandonment for merchants.
For Form Post, depending how this is implemented, either the iFrame can be located in the payment checkout or a re-direct to 3DS page.
For AJAX Post, the merchant can decide where the 3DS url is directed and can re-direct or host 3DS within their iFrame.
Below is an example of the 3D Secure browser-based authentication user experience for PC:
Below is an example of the 3D Secure browser-based authentication user experience for Mobile:
Custom CSS iframe
For merchants using custom CSS, the iframe dimensions for 3D Secure need to be setup to normalize the 3DS page dimensions the card issuer loads for the iframed 3D Secure.
Below is the Windcave recommended line of Custom CSS with the div ID for the setup:
| Custom CSS for iframed 3DS | div#ThreeDSChallengeDiv {width: 100% !important;}iframe#ThreeDSChallengeIFrame{width:420px;height:570px;display: block;margin: 0 auto;} |
For more information on iframe css, please see iframe Embedded HPP (REST).
Decoupled Authentication
Decoupled authentication provides a secure and streamlined way for cardholders to verify transactions without direct involvement with the 3D Secure requestor. This method allows the authentication process to occur separately and independently through the issuer’s ACS (Access Control Server).
The ACS facilitates this process, often through push notifications sent to the cardholders banking app. This notification prompts the cardholder to authenticate the payment via their chosen method of authentication.
The timeout period for the cardholder to respond and confirm the Decoupled authentication request is configurable by Windcave, with a default setting of 10 minutes.
Once the authentication process is finalized, the ACS communicates the results and liability shift to the merchant, enabling the transaction to proceed. By handling the authentication externally, it minimizes friction for the cardholder while maintaining high security standards.
Out of Band Authentication
Out of band (OOB) authentication is one of the possible methods/channels methods issuers can use to authenticate the 3D Secure challenge, it allows issuers to process the authentication outside of the merchants shopping environment.
An example of out of band authentication would be if the 3D Secure challenge page triggered a push notification to the issuers mobile banking app to authenticate the payment, in this scenario the cardholder may be prompted on the challenge page on their device, to open their issuers banking app to approve the payment.
Out of band authentication may be performed using a single device i.e. using the same device to access the merchant payment page and authentication application, or multiple devices i.e. using a PC’s web browser to process payment but authenticating through issuers banking application on mobile.
In both single and multiple device scenarios there is no additional implementation required by the merchant webserver, the out of band authentication will be handled by the issuer once customer is redirected to the 3D Secure challenge page.
Frictionless vs Challenge
When processing 3D Secure transactions there are two transaction flows the cardholder could experience. Which experience the cardholder sees is dependent on the risk level determined by the algorithm settings the particular issuer instructs their Access Control Server (ACS) to use. The ACS assesses the risk level based on various data elements including card holder's transaction history and transaction information provided by the 3D Secure Requestor and Merchant webserver.
If the risk assessment deems the transaction is low risk, the cardholder will experience a Frictionless flow. The Frictionless flow is where no further authentication is required by the cardholder and payment will process as normal i.e. after entering payment details cardholder will be redirected to the transaction result page.
If the risk assessment deems the transaction is high risk, the cardholder will experience a Challenge flow. The Challenge flow is where the cardholder will be presented with a challenge (varies between issuers), this challenge will require the cardholder to further authenticate they are the owner of the account. Once authenticated the transaction will proceed as normal i.e. cardholder will be redirected to the transaction result page.
3D Secure v2 introduces new required and optional data that merchants can either obtain from the cardholder or can configure the payment page to prompt for the data, which Windcave then passes on in the Authentication request. Examples of this information would be the card holder's shipping address, their phone number or their email address. The ACS will also automatically look at the card holder's payment history with the merchant and other merchants, but this requires no action from the merchant. All these factors are used by the issuers' ACS to assess risk of the transaction in real time.
By sharing additional data between the merchant and issuer, merchants can help reduce the chance of friction for their customers when making purchases online. Please refer to 3D Secure Fields for details on optional information that can be provided in the transaction request.
3D Secure v2 Challenge Preference
Merchants with 3D Secure have the option to indicate their challenge preference when processing transactions, whether it be a known customer and prefer not to challenge or based on the items ordered a challenge is preferred to be safe.
This is achieved by adding the challengeIndicator optional field to the Create Session REST API request, for a full list of available values please see Create Session. Below is an example of a simple Create Session request where challenge is preferred:
Endpoint:
POST https://sec.windcave.com/api/v1/sessions
Headers:
          Content-Type:application/json
          Authorization: Basic ABC123
Request Body:
          {
                "type": "purchase",
                "amount": "1.00",
                "currency": "NZD",
                "merchantReference": "1234ABC",
                "callbackUrls": {
                      "approved": "https://example.com/success",
                      "declined": "https://example.com/fail",
                      "cancelled": "https://example.com/cancel"
                },
                "notificationUrl": "https://example.com/txn_result?123",
                "threeds": {
          		    "challengeIndicator": "challengepreferred"
                }
          }
Non-Payment Authentication
Non-Payment Authentication (NPA) is the process of separating the 3D Secure Authentication from the payment experience, this is where the cardholder can be Authenticated prior to reaching the checkout and make the cardholder experience less stressful when making payment. Note that this process is to confirm the cardholder's account; This does not provide a liability shift for subsequent transactions using that stored token.
An intention of Non-Payment Authentication is to get the Access Control Server (ACS) to trigger a Challenge for a $0 token-creating authentication that may otherwise be authenticated as Frictionless, as the zero amount means it is below the threshold that would trigger a Challenge. Non-Payment Authentication increases the chance of a Challenge but does not guarantee it.
Examples of where Non-Payment Authentication may be used include:
- When a card is loaded onto a Mobile App, where the payment is not taken at the time of loading.
- Other use cases requiring the creation of a credit card token, where this token may be used for rebilling when a customer is signing up for a 'credential on file' or subscription-based service.
For merchants the setup process simply involves using a Non-Payment transaction type such as Validate.
Please note Non-Payment Authentication is not enabled by default. If you would like to have this enabled, please contact [email protected].
Validate
A Validate transaction type is used with the amount $0.00 (zero hold/no hold) to validate that the card sent, including expiry date, are valid with the acquirer and bank.
Often this is utilized to initially store a card as a token for future card rebilling with a token.
Strong Customer Authentication
As of September 14th, 2019, new rules were introduced for merchants/customers transacting within the European Economic Area (EEA), this was introduced under the legislation known as the Payment Service Directive (PSD) 2. The PSD2 legislation has a specific focus on payments through its regulations on Strong Customer Authentication (SCA).
For a transaction to be compliant under the new rules/regulations, Strong Customer Authentication (SCA) requires transactions meet at least two of the three components listed below. These are commonly referred to as two-factor authentication (2FA) or multi-factor authentication (MFA).
 |
Knowledge Something your customer knows e.g. a PIN code or password |
 |
Possession Something your customer has e.g. a credit card or electronic device |
 |
Inherence Something your customer is e.g. a fingerprint or facial recognition |
SCA makes transacting online more secure and helps reduce fraud. If you would like to read more about SCA requirements the Regulatory Technical Standards outlines the SCA guidelines here
Transactions not meeting SCA criteria where SCA is required will start being declined by the issuing bank. It is recommended merchants introduce SCA to reduce unwanted declines.
Windcave recommend implementing 3D Secure v2, Strong Customer Authentication (SCA) through 3D Secure as this is compliant with European PSD2 regulations.
SCA Exemptions
There are certain exemptions whereby transactions may not require SCA when processing, however this does mean that SCA cannot be applied for charge back protection. These exemptions include:
- Low Value Transactions (under €30 each)
- Fixed amount subscriptions
- Trusted beneficiaries
- MOTO and commercial payments
- Merchant-initiated transactions (MIT’s)
These exemptions can be requested by the merchant or acquirer, in which case the liability will stay with the merchant/acquirer.
However, even when not explicitly requested by the merchant/acquirer, some of these exemptions may still be applied by the issuer to avoid SCA friction. In these scenarios the liability remains with the issuer.
Low Value Transactions
Transactions under €30 each are exempt from SCA. The issuing bank will keep track of how many payments are made using this exemption.
Fixed Amount Subscriptions
Regular, fixed-amount transactions are exempt from SCA from the second transaction onwards.
The initial transaction and any change in the transaction amount requires SCA.
Note – in cases that these are flagged as merchant-initiated please refer to the MIT section below.
Trusted Beneficiaries
These are certain trusted merchants that are chosen by the cardholder.
Customers can assign businesses to a whitelist of trusted beneficiaries. This list is maintained by the customers’ bank and can be exempt from SCA.
This allows regular customers to usually skip SCA with the businesses they’ve chosen to whitelist.
MOTO and commercial payments
Mail Order and Telephone Order (MOTO) payments are exempt from SCA as they are not considered electronic payment types.
Merchant-Initiated Transactions (MIT’s)
MIT’s are transactions that have no direct customer involvement. Payment is taken from a securely saved card (with customers prior consent).
The first payment taken will be authenticated with SCA, however the following payments will be flagged as ‘Merchant Initiated Transaction’, therefore exempt from SCA.
For a payment to be categorized as a merchant-initiated transaction, the merchant must:
- Be approved by the customer to initiate the payment or series of payments.
- Initiate the payment without specific action from the customer to trigger the payment request.
Merchant requested vs Automatic exemptions
Merchant requested exemptions have a higher priority than automatic exemption. If the user has both automatic exemptions and merchant-requested exemptions, the Windcave system will use automatic exemptions only if there is no exemption in the New Session request.
Merchant-Requested Exemptions
Merchant-requested exemptions are a type of acquirer exemption that can be used to bypass Strong Customer Authentication (SCA) for certain online and contactless purchases.
A merchant can manually request an exemption using a REST Create Session where they can add the field threeds/scaExemption to specify the exemption type.
threeds/scaExemption
Implementing 3D Secure exemptions requires your REST API username be enabled for exemption functionality. If you are unsure or would like to enquire about adding 3D Secure exemptions to your REST account, please contact us.
Allowed values are:
- no
- mit
- tra
- recurring
- lowvalue
- scadelegation
- securecorporatepayment
Below is an example of a REST API Create Session request with merchant-requested exemption:
Endpoint:
POST https://sec.windcave.com/api/v1/sessions
Headers:
          Content-Type:application/json
          Authorization: Basic ABC123
Request Body:
          {
                "type": "purchase",
          	  "methods": ["card"],
                "amount": "1.06",
                "currency": "AUD",
          	  "threeds": {
          		    "scaExemption": "securecorporatepayment"
                },
                "callbackUrls": {
                      "approved": "https://example.com/success",
                      "declined": "https://example.com/fail",
                      "cancelled": "https://example.com/cancel"
                },
                "notificationUrl": "https://example.com/txn_result?123"
          }
Testing 3D Secure
Before proceeding with testing please follow the instructions in the Overview to sign up and receive your Windcave REST API development account. Please note 3D Secure is not enabled on test accounts by default, if you would like to enable 3D Secure, please contact [email protected].
Once enabled on the REST user the User Acceptance Testing (UAT) host can simulate the 3D Secure transaction process, this is triggered by using one of the below test cards at checkout:
| Test Card Number | Expiry Date | CVC | 3D Secure v2 Challenge Code |
|---|---|---|---|
| 5588 8800 0007 7770 | Any valid expiry date | Any 3 digits | 123 |
| 4111 1111 1111 1111 | 12/30 | Any 3 digits | Frictionless |
If you have any questions or encounter any issues while attempting to test 3D Secure please contact [email protected] and include your REST API username.
3D Secure Fields
3D Secure v2 introduces new fields that can be included in the Create Session requests. Merchants can use these fields to provide further information about the consumer making the payment or indicate their preference for the 3D Secure challenge.
Best practice from schemes is to include the customer email, billing and shipping address to improve the chances for a frictionless flow. If this information is included, Windcave recommends this data is validated before submitting the form.
Note that some business models may only require a billing address, however including all customer information where possible is recommended.
For more in-depth information on sending a Create Session request and processing the response, please refer to the API reference documentation.
Mandatory Fields
The below fields are mandated by schemes and must be populated when processing 3DS transactions:
Requirements for Hosted Payment Page, AJAX POST, and FORM POST implementations:
Populated in the Create Session request:
- Customer Email Address and/or Customer Phone Number (Work / Home / Mobile - at least one of these fields must be provided)
Populated when submitting payment information
- Cardholder Name (Captured by Windcave in Hosted Payment Page, for AJAX POST or Form Post merchant webserver must submit as in the FORM POST or AJAX POST from client-site)
Requirements for Server-Side POST 3RI implementations:
Populated in the Create Transaction request, see Server Side Post & 3D Secure for more information:
- Customer Email Address and/or Customer Phone Number (Work / Home / Mobile - at least one of these fields must be provided)
- Cardholder Name
The below fields although optional are also highly recommended for all implementation types; including these fields will increase the likelihood of 3D Secure being Frictionless during checkout for your customers:
- Customer Billing Address City
- Customer Billing Address Country
- Customer Billing Address Line 1
- Customer Billing Address Postal Code
- Customer Billing Address State
Below is an example of a simple Create Session request with mandatory 3D Secure fields.
Endpoint:
POST https://sec.windcave.com/api/v1/sessions
Headers:
          Content-Type:application/json
          Authorization: Basic ABC123
Request Body:
          {
                "type": "purchase",
                "amount": "123.00",
                "currency": "USD",
                "merchantReference": "1234ABC",
                "callbackUrls": {
                      "approved": "https://example.com/success",
                      "declined": "https://example.com/fail",
                      "cancelled": "https://example.com/cancel"
                },
          	  "customer": {
                  "email": "[email protected]",
                  "phoneNumber": "+11234567890",
                  "homePhoneNumber": "+11234567890",
                  "billing": {
                      "name": "John Doe",
                      "address1": "123 Test Street",
                      "city": "deliverytown",
                      "countryCode": "US",
                      "postalCode": "12345",
                      "state": "NY"
                  }
                }
          }
Below is an example of a simple Create Transaction request with mandatory 3D Secure fields.
Endpoint:
POST https://sec.windcave.com/api/v1/transactions
Headers:
          Content-Type:application/json
          Authorization: Basic ABC123
Request Body:
          {
                "type": "purchase",
                "amount": "123.00",
                "currency": "USD",
                "merchantReference": "1234ABC",
                "callbackUrls": {
                      "approved": "https://example.com/success",
                      "declined": "https://example.com/fail",
                      "cancelled": "https://example.com/cancel"
                },
          	  "customer": {
                  "email": "[email protected]",
                  "phoneNumber": "+11234567890",
                  "homePhoneNumber": "+11234567890",
                  "billing": {
                      "name": "John Doe",
                      "address1": "123 Test Street",
                      "city": "deliverytown",
                      "countryCode": "US",
                      "postalCode": "12345",
                      "state": "NY"
                  }
                }
          }
Optional Fields
Adding the 3D Secure Optional fields simply requires the merchant webserver to include the threeds array with the fields they opt to include in the Create Session or Create Transactions request.
Below is an example of a simple Create Session request with optional 3D Secure fields.
Endpoint:
POST https://sec.windcave.com/api/v1/sessions
Headers:
          Content-Type:application/json
          Authorization: Basic ABC123
Request Body:
          {
                "type": "purchase",
                "amount": "123.00",
                "currency": "USD",
                "merchantReference": "1234ABC",
                "callbackUrls": {
                      "approved": "https://example.com/success",
                      "declined": "https://example.com/fail",
                      "cancelled": "https://example.com/cancel"
                },
          	  "customer": {
                  "email": "[email protected]",
                  "shipping": {
                      "name": "John Doe",
                      "address1": "123 Test Street",
                      "address2": "",
                      "address3": "",
                      "city": "deliverytown",
                      "countryCode": "US",
                      "postalCode": "12345",
                      "phoneNumber": "+11234567890",
                      "state": "NY"
                  },
                  "billing": {
                      "name": "John Doe",
                      "address1": "123 Test Street",
                      "address2": "",
                      "address3": "",
                      "city": "deliverytown",
                      "countryCode": "US",
                      "postalCode": "12345",
                      "phoneNumber": "+11234567890",
                      "state": "NY"
                  }
              },
                "notificationUrl": "https://example.com/txn_result?123",
                "threeds": {
          		    "challengeIndicator": "challengepreferred",
          		    "accountID": "123456789",
          		    "accountInfo":{
          			      "accountAgeIndicator": "thistransaction",
          			      "accountChangeDate": "2023-07-26",
          			      "accountChangeIndicator": "morethan60days",
          			      "accountOpeningDate": "2020-01-01",
          			      "passwordChangeDate": "2023-01-02",
          			      "passwordChangeIndicator": "lessthan30days",
          			      "purchasesCount": "20",
          			      "provisionAttemptsPerDay": "0",
          			      "transactionsPerDay": "1",
          			      "transactionsPerYear": "12",
          			      "paymentAccountEnrollmentDate": "2020-01-01",
          			      "paymentAccountAgeIndicator": "morethan60days",
          			      "shippingAddressFirstUsageDate": "2020-01-02",
          			      "shippingAddressFirstUsageIndicator": "morethan60days",
          			      "shippingNameIndicator": "different"
          			      "suspiciousActivity": "0"
          		    },
          		    "merchantRiskIndicator":{
          			      "deliveryEmailAddress": "[email protected]",
          			      "deliveryTimeframe": "electronic",
          			      "giftCardAmount": "123",
          			      "giftCardCount": "5",
          			      "giftCardCurrency": "USD",
          			      "preOrderDate": "2019-03-20",
          			      "preOrderPurchaseIndincator": "now",
          			      "reorderItemsIndicator": "reorder",
          			      "shippingIndicator": "digital"
          		    }
                }
          }
Below is an example of a simple Create Transaction request with optional 3D Secure fields.
Endpoint:
POST https://sec.windcave.com/api/v1/transactions
Headers:
          Content-Type:application/json
          Authorization: Basic ABC123
Request Body:
          {
                "type": "purchase",
                "amount": "123.00",
                "currency": "USD",
                "merchantReference": "1234ABC",
                "callbackUrls": {
                      "approved": "https://example.com/success",
                      "declined": "https://example.com/fail",
                      "cancelled": "https://example.com/cancel"
                },
          	  "customer": {
                  "email": "[email protected]",
                  "shipping": {
                      "name": "John Doe",
                      "address1": "123 Test Street",
                      "address2": "",
                      "address3": "",
                      "city": "deliverytown",
                      "countryCode": "US",
                      "postalCode": "12345",
                      "phoneNumber": "+11234567890",
                      "state": "NY"
                  },
                  "billing": {
                      "name": "John Doe",
                      "address1": "123 Test Street",
                      "address2": "",
                      "address3": "",
                      "city": "deliverytown",
                      "countryCode": "US",
                      "postalCode": "12345",
                      "phoneNumber": "+11234567890",
                      "state": "NY"
                  }
              },
                "notificationUrl": "https://example.com/txn_result?123",
                "threeds": {
          		    "challengeIndicator": "challengepreferred",
          		    "accountID": "123456789",
          		    "accountInfo":{
          			      "accountAgeIndicator": "thistransaction",
          			      "accountChangeDate": "2023-07-26",
          			      "accountChangeIndicator": "morethan60days",
          			      "accountOpeningDate": "2020-01-01",
          			      "passwordChangeDate": "2023-01-02",
          			      "passwordChangeIndicator": "lessthan30days",
          			      "purchasesCount": "20",
          			      "provisionAttemptsPerDay": "0",
          			      "transactionsPerDay": "1",
          			      "transactionsPerYear": "12",
          			      "paymentAccountEnrollmentDate": "2020-01-01",
          			      "paymentAccountAgeIndicator": "morethan60days",
          			      "shippingAddressFirstUsageDate": "2020-01-02",
          			      "shippingAddressFirstUsageIndicator": "morethan60days",
          			      "shippingNameIndicator": "different"
          			      "suspiciousActivity": "0"
          		    },
          		    "merchantRiskIndicator":{
          			      "deliveryEmailAddress": "[email protected]",
          			      "deliveryTimeframe": "electronic",
          			      "giftCardAmount": "123",
          			      "giftCardCount": "5",
          			      "giftCardCurrency": "USD",
          			      "preOrderDate": "2019-03-20",
          			      "preOrderPurchaseIndincator": "now",
          			      "reorderItemsIndicator": "reorder",
          			      "shippingIndicator": "digital"
          		    }
                }
          }
3D Secure & Risk Management
The Windcave Risk Management engine allows merchants to configure custom rules to help prevent fraudulent transactions, for merchants also using 3D Secure there are additional features/functionality that can be implemented.
Skip Risk Management
3D Secure enabled merchants can opt to skip any configured Risk Management rules for transactions that have been authenticated by 3D Secure, merchants can use this feature to allow transactions that they would usually block due to it being authenticated by 3D Secure and liability shift occurring.
Risk Management Triggered 3D Secure
3D Secure enabled merchants whose acquirer does not mandate 3D Secure can opt to only attempt 3D Secure authentication when a Risk Management Rule is triggered. This allows merchants to set the conditions for when a 3D Secure check should be attempted based on various Risk Management rules.
Skip Risk Management and Risk Management Triggered 3D Secure are features enabled on the Windcave Host and do not require any alterations to the merchant REST API integration.
If you would like further information or to enable this functionality, please contact [email protected] with your REST username.
Address Verification Service (AVS)
Address Verification Service (AVS) is an additional fraud-prevention layer used during card-not-present transactions.
When enabled, the payment gateway forwards the customer's billing address details to the acquirer. The acquirer then validates the information with the card scheme and an AVS result is returned indicating how closely the submitted address matches.
Different configuration options are available depending on the merchant's requirements. Verify with your acquirer whether AVS is supported in your region.
The options below explain how the system behaves in each AVS mode:
1 = The system will run an AVS check whenever it is able to. If AVS is supported, the transaction is checked and an AVS result is returned. If AVS is not supported, the transaction continues as normal.
2 = Every transaction must include an AVS check. If AVS cannot run for any reason, the transaction is blocked. This ensures AVS is always part of the authorisation process.
3 = The system attempts an AVS check and records the result, but the outcome is not used to approve or decline the transaction. The payment always continues regardless of the AVS result.
4 = The system runs AVS when supported. If AVS is unavailable, the transaction continues normally. If AVS runs and returns an AvsResultCode response of “N”, (address and postcode do not match what the issuer has on file), the transaction is declined. Partial AVS matches such as postcode-only matches or address-only matches are accepted.
Below is a sample Create Session with AVS request:
          {
              "type": "purchase",
              "amount": "10.00",
              "currency": "NZD",
              "merchantReference": "PurchaseTest",
              "callbackUrls": {
                  "approved": "https://www.windcave.com/success",
                  "declined": "https://www.windcave.com/fail",
                  "cancelled": "https://www.windcave.com/cancel"
              },
              "notificationUrl": "https://www.windcave.com/txn_result?123",
              "avs": {
                  "streetAddress": "123 Test Street",
                  "avsAction": "1",
                  "postCode": "2000"
              }
          }
The following example shows the AVS object returned within the transaction array of the Create Session response.
For full response details, please refer to the Windcave Apiary documentation.
          {
            },
            "transactions": [
              {
                "avs": {
                  "postCode": "2000",
                  "streetAddress": "123 Test Street",
                  "avsAction": 1,
                  "avsActionName": "Attempt",
                  "avsResultCode": "Q",
                  "avsResultDescription": "Q - card name, address, and postcode matched"
                }
              }
            ]
          }
Testing
The following details can be used when completing UAT testing with AVS.
| Scenario | Description | Card Number | Address | Post Code | Card Name |
|---|---|---|---|---|---|
| B | Address matched, postcode not verified | 4929 2891 5048 9150 | 100 Queen Street | - | - |
| P | Postcode matched, address not verified | 5470 4875 3743 5090 | - | 2000 | - |
| M | Address and postcode matched | 3700 4751 2115 125 | 100 Queen Street | 2000 | A Andrew |
AVS Result Codes
The below table outlines AVS response codes and text.
| Code | Text |
|---|---|
| A | Address matched - ZIP not matched |
| B | Address matched, postcode not verified |
| C | Address and postcode not matched |
| D | Address and postcode matched |
| E | AVS data is invalid, or AVS not allowed for this card type |
| F | Address and postcode matched (U.K) |
| G | AVS not support |
| H | Card name not matched, postcode matched |
| I | Address information not verified |
| J | Card name, address and postcode matched |
| K | Card name matched, address and postcode not matched |
| L | Card name and postcode matched, address not matched |
| M | Address and postcode matched |
| N | Address and postcode not matched |
| O | Card name and address matched, postcode not matched |
| P | Postcode matched, address not verified |
| Q | Card name, address and postcode matched |
| R | System unavailable (re-try) |
| S | AVS not supported |
| T | Card name not matched, address matched |
| U | Address information not available, or AVS is unavailable |
| V | Card name, address and postcode matched |
| W | Address not matched, 9-digit ZIP matched |
| X | Address and 9-digit ZIP matched |
| Y | Address and 5-digit ZIP matched |
| Z | Address not matched, 5-digit ZIP matched |
Fail Proof Result Notification
Fail Proof Result Notification (FPRN) is a Windcave server-side service, it is designed to provide an additional level of assurance that the merchant web server receives notification of the payment outcome.
In the event the merchant web server is temporarily unavailable when the cardholder's payment is being finalized or if the cardholder prematurely closing their browser before navigating back to the merchant's webpage, these are scenarios where FPRN can provide assistance to help ensure the merchant web server can obtain the payment outcome.
Implementing FPRN
Merchants implementing FPRN should include the notificationUrl field in their Create Session or Create Transaction request, this field should be populated with the merchant's endpoint that will accept and handle the FPRN notifications. Please note the notificationUrl should not require cookies in the request to function, the FPRN notification is sent from Windcave not the cardholders browser.
Below is an example of a simple Create Session request with notificationUrl:
Endpoint:
POST https://sec.windcave.com/api/v1/sessions
Headers:
          Content-Type:application/json
          Authorization: Basic ABC123
Request Body:
          {
           "type": "purchase",
           "amount": "1.00",
           "currency": "NZD",
           "merchantReference": "1234ABC",
           "callbackUrls": {
            "approved": "https://example.com/success",
            "declined": "https://example.com/fail",
            "cancelled": "https://example.com/cancel"
           },
           "notificationUrl": "https://example.com/txn_result?123"
          }
Below is an example of a simple Create Transaction request with notificationUrl:
Endpoint:
POST https://sec.windcave.com/api/v1/transactions
Headers:
          Content-Type:application/json
          Authorization: Basic ABC123
Request Body:
          {
           "type": "purchase",
           "amount": "12.34",
           "currency": "NZD",
           "merchantReference": "1234ABC",
           "card": {
            "cardHolderName": "JOHN T DOE",
            "cardNumber": "4111111111111111",
            "dateExpiryMonth": "12",
            "dateExpiryYear": "26",
            "cvc2": "123"
           },
           "notificationUrl": "https://example.com/txn_result?123"
          }
By default, FPRN notifications are sent immediately upon session or transaction completion; it is sent in the form of a HTTP GET request with a query string parameter of sessionId or transactionId appended. Using the query string parameter the merchant web server can initiate a Query Session or Query transaction request to obtain the outcome of the payment.
Upon receiving the notification, the merchant notificationUrl should resolve to a HTTP 200, 302 or 303 HTTP status code, this indicates to the Windcave Host that the notification has been successfully received.
In the event the merchants notificationUrl is unreachable or returns any HTTP status code other than 200 (OK) or 404 (Not Found), the Windcave host will reattempt sending of the FPRN notification. For more information about reattempts please see FPRN Reattempts.
Merchant FPRN Guidelines
To ensure the merchant web application is in the best position to acknowledge the outcome of each and every FPRN notification, merchants should ensure the below guidelines are adhered to:
- Filter or base any conditional logic upon the originating IP address of the FPRN notification as this may vary.
- Depend on receiving only a single HTTP GET/POST request to the notificationUrl from the FPRN service (multiple requests may be sent).
- Fully ignore FPRN requests, at minimum FPRN request must be responded to.
- Utilize the same endpoint for the notificationUrl and other callbackUrls where possible to assist in debugging any race conditions.
- Respond to each FPRN request, the response should be empty and ideally with a HTTP 200 status code.
- Rely on the notificationUrl to receive the FPRN notification message.
- Extract the sessionId (HPP, Form Post or AJAX Post) or transactionId (Server-Side Post) query string in the HTTP GET request.
- Use the extracted query string parameter and send a Query Session (HPP, Form Post or AJAX Post) or Query Transaction (Server-Side Post) request to obtain the final transaction result.
- Perform any required database operations or communications i.e., updating/creating an order record or sending email confirmation.
- Must ensure the notificationUrl specified is exposed via standard internet ports i.e., 80 or 443 for SSL/TLS traffic.
- Watch for race conditions between redirects and FPRN notifications, the payment result should only be processed once. In majority of payments this might mean not acting on the FRPN callback as the redirect is the end user who will likely want to see their payment outcome (HPP, Form Post and AJAX Post integrations).
FPRN Reattempts
If the merchants notificationUrl is unreachable or returns any HTTP status code other than 200 (OK), 404 (Not Found) or 502 (Bad Gateway), FPRN will reattempt sending the notification according to the Restful users FPRN configuration. By default, FPRN notifications are reattempted once every 10minutes for the first hour after which time it will be reattempted once every hour for the next 24 hours.
Windcave recommend using the default configuration where possible, however custom FPRN configurations can be created for merchants that have unique notification reattempt requirements.
Additionally, if required an email address can be configured for custom FPRN reattempts, in the event all reattempts have failed an email will be sent to the configured address with a subject line indicating that FPRN has failed for a particular transactionId.
FPRN HTTP POST
By default, the FPRN notification is sent as a HTTP GET request, this can however be configured per Restful API username to send a HTTP POST request if preferred/required by merchants.
Once enabled on the Restful API username, the Windcave host will send a HTTP POST request instead of a HTTP GET request to the merchant web server. The content of the HTTP POST request follows the Query Transaction response format for all Restful integration methods, this means the payment result is returned directly in the FPRN notification and no additional request is required. For further information regarding the format of the HTTP POST content, please refer to the query transaction response section of the API reference documentation.
FPRN Custom Features
The below are custom FPRN features that can be enabled if required:
- Custom FPRN HTTP Status Behavior
- Custom FPRN Query String Parameters
- Static URL FPRN
- Custom FPRN Send Delay
Stored Card
Merchants can utilize Stored Card functionality to generate a secure token of the payment card used at checkout, with the cardholder’s permission merchants can use this token to speed up the checkout process for future payments or process recurring payments.
3D Secure & Rebilling
3D Secure rebilling is not currently supported on Create Transaction based Implementations.
For more information about 3D Secure please refer to https://www.windcave.com/support-merchant-3d-secure.
Stored Card Tokens
Merchants utilizing stored card functionality will be returned a Windcave generated multiuse token, this token links to the stored card credentials at Windcave and allows the merchant to initiate future payments initiated by the cardholder or by the merchant on the cardholder's behalf.
The default token type returned is a cardId, this token is a 16-digit numeric value. The cardId value does not have a one-to-one relationship with the card number, as such multiple captures of the same card will generate different cardId values.
Supported Payment Methods
Not all payment methods support stored card functionality, by default any non-supported payment methods will not be available for selection on the HPP when the storeCard field is set to "true".
Below are the payment methods that currently support stored card functionality:
- card
- clicktopay
- googlepay
- applepay
- ach
Windcave can enable non supported payment methods to be available on the HPP even if storeCard is set to "true", however these payment methods will NOT return a stored card token value in the final transaction response.
Stored Card Implementation
Stored Card Indicators
Mandates from the major card schemes require merchants indicate the reason a card is being stored and/or stored card being charged at time of payment.
To comply with these mandates merchants must include the appropriate storedCardIndicator in the Create Session or Create Transaction request, the value used depends on the payments position in the rebilling sequence.
Stored Card Indicators can be broken into three groups:
- Initial - Payment is the first/initial transaction in the rebilling sequence
- Established - Payment is a continuation of an already established rebilling sequence
- Industry Specific Business Practice (ISBP) - Special use cases for Industry Specific Business Practices
Initial Stored Card Indicators
The below storedCardIndicator values should be used for the initial payment in the rebilling sequence, this could be at the time of storing the card or when the cardholder/merchant are initiating a new rebilling sequence i.e., cardholder adds a new subscription to their account.
| storedCardIndicator | Description | Additional Requirements |
|---|---|---|
| credentialonfileinitial | Cardholder will save card and for future orders the cardholder selects to reuse the saved card for the one-off payment. | |
| unscheduledcredentialonfileinitial | Cardholder will save their card and for future order based on an event (such as top-up) the merchant will reuse the saved card on behalf of the cardholder for the one-off payment. | |
| recurringfixedinitial | Cardholder will save their card and merchant will reuse the saved card on behalf of cardholder for the subscribed recurring payments of fixed amount e.g., monthly account fee for streaming service | Merchants must also include the fields recurringExpiry and recurringFrequency in the Create Session/Create Transaction Request. |
| recurringvariableinitial | Cardholder will save their card and merchant will reuse the saved card on behalf of cardholder for the subscribed recurring payments of variable amount e.g., recurring payment for power bill where amount due may vary | Merchants must also include the fields recurringExpiry and recurringFrequency in the Create Session/Create Transaction Request. |
| installmentinitial | Cardholder will save their card and merchant will reuse the saved card on behalf of cardholder for the installment payments. | Merchants must also include the fields installmentCount, installmentNumber, installmentFrequency and installmentExpiry in the Create Session/Create Transaction Request. |
Established Stored Card Indicators
The below storedCardIndicator values should be used for payments that are part of an already established rebilling sequence, this could be the next monthly payment in the cardholders billing cycle or cardholder using their saved card to make a one-off payment.
| storedCardIndicator | Description | Additional Requirements |
|---|---|---|
| credentialonfile | Cardholder selects their saved card to make the one-off payment. | |
| unscheduledcredentialonfile | Merchant initiated and event driven one-off rebilling with stored card (e.g., auto top-ups). | |
| recurringnoexpiry | Merchant initiated recurring transaction with a stored card token where no card expiry check needs to occur (e.g., subscriptions). | Merchants must also include the fields recurringExpiry and recurringFrequency in the Create Session/Create Transaction Request. |
| recurringfixed | Merchant initiated recurring transaction with a stored card token (e.g., subscriptions) where amount is fixed e.g., monthly account fee for streaming service | Merchants must also include the fields recurringExpiry and recurringFrequency in the Create Session/Create Transaction Request. |
| recurringvariable | Merchant initiated recurring transaction with a stored card token (e.g., subscriptions) where amount is varied e.g., monthly power bill payment | Merchants must also include the fields recurringExpiry and recurringFrequency in the Create Session/Create Transaction Request. |
| installment | Merchant initiated rebilling payments in installments with a stored card token. | Merchants must also include the fields installmentCount, installmentNumber, installmentFrequency and installmentExpiry in the Create Session/Create Transaction Request. |
ISBP Stored Card Indicators
The below storedCardIndicator values should be used for industry specific business practices only.
| storedCardIndicator | Description | Additional Requirements |
|---|---|---|
| partialshipment | Merchant initiated transaction with token for part of a shipment e.g., shipping items as they become available and taking payment for only items shipped. | |
| incremental | Merchant initiated incremented transaction amount to rebill e.g., hospitality or rentals etc. | |
| resubmission | Merchant resubmits rebill with token where it requested an authorization but may have received a decline due to insufficient funds and the order already delivered to the cardholder. Used with the token to get an outstanding payment from cardholder. | |
| reauthorisation | Merchant initiated when the completion or conclusion of the original order or service extends beyond the authorization validity. Common for retail (split or delayed shipments) and hospitality or rental services scenarios. | |
| delayedcharges | Merchant initiated to process additional account rebill charge after original order and payment has already been processed and fulfilled. | |
| noshow | Merchant initiated to charge the cardholder a penalty relevant to the merchant’s cancellation policy. Common for guaranteed reservations scenarios (e.g., Hospitality). |
Recurring Expiry & Frequency
Some storedCardIndicator require the merchant web application to include a recurringExpiry and recurringFrequency to outline the frequency and end of the recurring payments.
The below outlines the requirements for the recurringExpiry and recurringFrequency fields:
| Field | Value | Additional Notes |
|---|---|---|
| recurringExpiry | YYYY-MM-DD | Configured to the date the recurring payments will end/expire.
For scenarios where no expiry/end date is established i.e., subscription payments, the merchant web application should use "9999-12-31" as the value. |
| recurringFrequency |
|
Configured to one of the value options listed and indicates the frequency recurring payments for the stored card. |
Storing Phase
It is at this phase that the merchant web application requests a card be stored for future rebilling, the process below outlines the deviations from the standard integration walkthrough process detailed here: HPP, Form Post, AJAX Post or Server-Side Post.
When sending a Create Session/Create transaction request to store a card, the merchant web application must set the storeCard boolean to "true" and include an appropriate storedCardIndicator in their request.
Below is an example of a basic Create Session request with storeCard and storedCardIndicator included:
Endpoint:
POST https://sec.windcave.com/api/v1/sessions
Headers:
          Content-Type:application/json
          Authorization: Basic ABC123
Request Body:
          {
           "type": "purchase",
           "amount": "12.34",
           "currency": "NZD",
           "merchantReference": "1234ABC",
           "callbackUrls": {
            "approved": "https://example.com/success",
            "declined": "https://example.com/fail",
            "cancelled": "https://example.com/cancel"
           },
           "notificationUrl": "https://example.com/txn_result?123",
           "storeCard": true,
           "storedCardIndicator": "credentialonfileinitial"
          }
Below is an example of a basic Create Transaction request with storeCard and storedCardIndicator included:
Endpoint:
POST https://sec.windcave.com/api/v1/transactions
Headers:
          Content-Type:application/json
          Authorization: Basic ABC123
Request Body:
          {
           "type": "purchase",
           "amount": "12.34",
           "currency": "NZD",
           "merchantReference": "1234ABC",
           "card": {
            "cardHolderName": "JOHN T DOE",
            "cardNumber": "4111111111111111",
            "dateExpiryMonth": "12",
            "dateExpiryYear": "26",
            "cvc2": "123"
           },
           "notificationUrl": "https://example.com/txn_result?123",
           "storeCard": true,
           "storedCardIndicator": "credentialonfileinitial"
          }
Once the payment has been processed and the merchant web application has received the final Query Session/Create Transaction response, the merchant web application needs to extract and store the token value.
The cardId token is stored in the card object of the transaction record, the merchant web application should extract the value from the id field of the card object and associate/store this against their account records for the cardholder.
Below is an example of a basic card object with a cardId token:
          {
           "card": {
            "id": "1234567891012345",
            "cardHolderName": "JOHN T DOE",
            "cardNumber": "411111......1111",
            "dateExpiryMonth": "12",
            "dateExpiryYear": "26",
            "type": "visa"
          }
          }
Rebilling Phase
It is at this phase that the merchant web application requests a stored card be rebilled, the process below outlines the deviations from the standard integration walkthrough process detailed here: HPP, Form Post, AJAX Post or Server-Side Post.
When sending a Create Session/Create Transaction request to rebill a stored card, the merchant web application must include the token value and an appropriate storedCardIndicator in their request.
Create Session Rebill
Below is an example of a basic Create Session request with cardId and storedCardIndicator included:
Endpoint:
POST https://sec.windcave.com/api/v1/sessions
Headers:
          Content-Type:application/json
          Authorization: Basic ABC123
Request Body:
          {
           "type": "purchase",
           "amount": "12.34",
           "currency": "NZD",
           "merchantReference": "1234ABC",
           "callbackUrls": {
            "approved": "https://example.com/success",
            "declined": "https://example.com/fail",
            "cancelled": "https://example.com/cancel"
           },
           "notificationUrl": "https://example.com/txn_result?123",
           "cardId": “1234567891012345”,
           "storedCardIndicator": "credentialonfile"
          }
Once the session has been created the merchant web application should:
- HPP Implementations must redirect the cardholder to the HPP link, if no further input is required the cardholder will be redirected to appropriate callback URL; alternatively the cardholder may be prompted to input further details, see Rebilling Exception Scenarios for further information and examples.
- Form Post Implementations must Post the client-side form even if no card data i.e., expiry date or CVC is to be included.
- AJAX Post Implementations must Post the client-side AJAX request even if no card data i.e., expiry date or CVC is to be included.
Create Transaction Rebill
Below is an example of a basic Create Transaction request with cardId and storedCardIndicator included:
Endpoint:
POST https://sec.windcave.com/api/v1/transactions
Headers:
          Content-Type:application/json
          Authorization: Basic ABC123
Request Body:
          {
           "type": "purchase",
           "amount": "12.34",
           "currency": "NZD",
           "merchantReference": "1234ABC",
           "notificationUrl": "https://example.com/txn_result?123",
           "cardId": “1234567891012345”,
           "storedCardIndicator": "credentialonfile"
          }
Once the Create Transaction request has been submitted the merchant web application should follow the Server-Side Post Walkthrough process to obtain the transaction result.
Rebilling Exception Scenarios
Outlined below are exceptions scenarios to the standard rebilling process where additional data or input is required:
Expired Card on Rebill
If the card associated with a token has expired, the cardholder can be prompted to enter a new expiry if their card issuer has reissued the same card with a new expiry.
The merchant web application should follow the below guidelines when encountering this scenario:
HPP Implementations
For merchants using a HPP implementation, upon redirecting the customer if the card to be used has expired the cardholder will be prompted to input a new expiry date into the HPP:
Once submitted the payment result will be returned per the standard HPP Walkthrough procedure.
Form Post Implementations
For merchants using a Form Post implementation, upon receiving declined transaction result the merchant web application can validate if the dateExpiryMonth and dateExpiryYear fields of the card object have expired or not.
If the card has expired the merchant web application should prompt the cardholder to input a new expiry or choose to provide a different payment card; this is achieved by rendering a client-side merchant hosted HTML form with only the ExpiryMonth and ExpiryYear form inputs (If the cardholder opts to provide a different payment card, then the standard Form Post Walkthrough procedure should be followed).
Once submitted the client-side HTML form should post the content of the ExpiryMonth and ExpiryYear fields as Key Values directly to the Windcave Form Post URL, the payment result will be handled per the standard Form Post Walkthrough procedure.
AJAX Post Implementations
For merchants using an AJAX Post implementation, upon receiving declined transaction result the merchant web application can validate if the dateExpiryMonth and dateExpiryYear fields of the card object have expired or not.
If the card has expired the merchant web application should prompt the cardholder to input a new expiry or choose to provide a different payment card; this is achieved by rendering a client-side merchant hosted form with only the dateExpiryMonth and dateExpiryYear inputs (If the cardholder opts to provide a different payment card, then the standard AJAX Post Walkthrough procedure should be followed).
Once submitted the client-side form should post the dateExpiryMonth and dateExpiryYear fields directly to the Windcave AJAX Post URL, the payment result will be handled per the standard AJAX Post Walkthrough procedure.
Server-Side Post Implementations
For merchants using a Server-Side Post implementation, upon receiving a declined transaction result the merchant webserver can validate if the dateExpiryMonth and dateExpiryYear fields of the card object have expired or not.
If the card has expired the merchant webserver should prompt the cardholder to input a new expiry or choose to provide a different payment card; how this is implemented is the responsibility of the merchant (If the cardholder opts to provide a different payment card, then the standard Server-Side Post Walkthrough procedure should be followed).
Once submitted the updated dateExpiryMonth and dateExpiryYear fields should be sent in the Create Transaction request, the payment result will be handled per the standard Server-Side Post Walkthrough procedure.
CVC Capture on Rebill
Some acquirers or merchant may require or prefer to capture the card security code (CVC) from the cardholder when rebilling a token.
The merchant web application should follow the below guidelines when encountering this scenario:
HPP Implementations
For merchants using a HPP implementation, the CVC capture on rebilling is handled by Windcave on the HPP.
Unless mandated by your acquirer CVC capture on rebilling is disabled by default, if you would like to enable CVC capture on rebilling, please contact [email protected] with your Rest username.
Once enabled when processing a rebilling transaction, the cardholder will be prompted to input their CVC once redirected to the HPP, the CVC input can be set to mandatory (CVC must be entered before proceeding) or optional (cardholder is prompted but not required to input their CVC).
Once submitted the payment result will be returned per the standard HPP Walkthrough procedure.
Form Post Implementations
For merchants using a Form Post implementation, the client-side merchant hosted HTML form should be rendered with only the Cvc2 input.
Once submitted the client-side HTML form should post the content of the Cvc2 field as a Key Value directly to the Windcave Form Post URL, the payment result will be handled per the standard Form Post Walkthrough procedure.
AJAX Post Implementations
For merchants using an AJAX Post implementation, the client-side merchant hosted form should be rendered with only the cvc2 input.
Once submitted the client-side form should post the content of the cvc2 field directly to the Windcave AJAX Post URL, the payment result will be handled per the standard AJAX Post Walkthrough procedure.
Server-Side Post Implementations
For merchants using a Server-Side Post implementation, the merchant webserver should request the cardholder input their cvc2; how this is implemented is the responsibility of the merchant.
Once submitted the updated cvc2 field should be sent in the Create Transaction request, the payment result will be handled per the standard Server-Side Post Walkthrough procedure.
Subscription Invoices
The Windcave Subscription Invoice solution allows merchants to set up automatic periodic charges of customers.
This solution has been designed for paying in advanced. i.e. if the merchant sets up a monthly subscription that is effective immediately, Windcave will charge the customer on set up, ensuring payment for the first month has been received from the customer.
Implementing Subscription Invoices
Every billing cycle generates an invoice that Windcave attempts to fulfil using the payment details stored with the subscription. The invoice represents the intention (requirement) to pay for the subscription, so only one invoice per billing cycle.
If the payment fails, Windcave will re-attempt the payment per configured frequency, per configured max re-attempts for the request or REST user. All the transaction attempts are recorded against the invoice that Windcave are trying to fulfil. The invoice status will indicate whether payment has been made or not.
The Subscription process can be broken into two groups:
- Subscription Set-up - This is the first / initial transactions in the subscription process
- Established - Payment is a continuation of an already established subscription sequence. This includes the processes for querying invoices/payments, updating subscriptions and cancelling subscriptions.
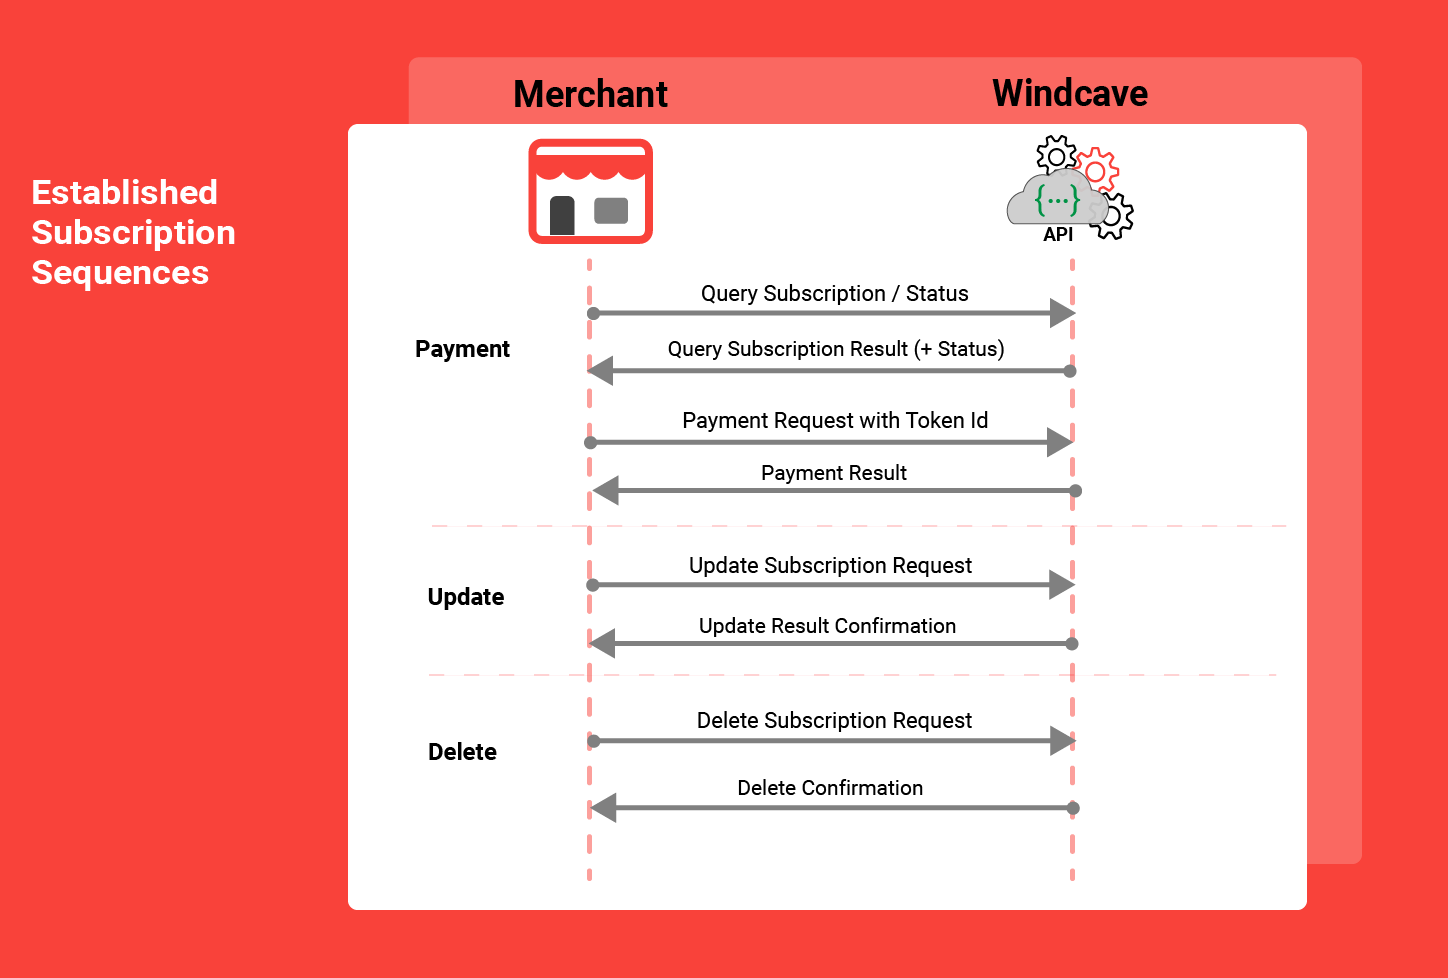
Create Subscriptions
In order to process subscription payments for the cardholder, the merchant webserver sends the Create Subscription request with optional input fields.
Input values are shown below:
| Field Name | Description |
|---|---|
| recurringFrequency |
The frequency of the subscriptions. Values are:
|
| recurringCount | The number of subscription payments e.g. 4 (entry must be greater than 0). |
| recurringStartDateTime | The specific date/time of the first billing cycle. This should be in RFC-3339 format e.g. 2024-02-22T20:10:13z Note: RecurringStartDateTime cannot be 5 minutes in the past. |
| recurringTimeZone | Specifies the time zone that will be used to calculate the billing cycle run time. If omitted, the time zone from the user settings will be used. |
| currency | Specifies the currency for recurring transactions. If omitted, the user's default currency is used. |
| recurringAmount | The amount for the recurring transactions, e.g. 15.00 |
| cardId | Specifies the billing token ID that will be used for running recurring transactions. |
| customerId | Specifies the merchant's customer ID that the subscription will be associated with. Note: When both the cardId and customerId are provided, the cardId has to belong to the provided customerId. If the customerId is omitted, but the cardId is associated with a customer the subscription will be associated with that customer. If the cardId has no associated customer, a new subscription will be created with no customer association. |
| merchantReference | Specifies the reference that the merchant wants to assign to the subscription. |
| notificationUrl | Specifies the merchant's endpoint that will accept and handle FPRN notifications. Please note the notificationUrl should not require cookies in the request to function, the FPRN notification is sent from Windcave not the cardholders browser. |
| retriesCount | Specifies how many times to reattempt failed payments. If omitted, the retriesCount from the user settings will be used. |
| retriesFrequency | The frequency to reattempt failed payments. If omitted, the default of "daily" will be applied.
|
Example Scenario
- A merchant creates a monthly subscription on 15/10/2024 for $15.00, effective immediately.
- Windcave execute the charge and set the next run time to 15/11/2024.
As soon as the start date occurs, the payment for the subscription begins.
Using the example above, the below is a simple Create Subscription request:
Endpoint:
POST https://sec.windcave/api/v1/subscriptions
Headers:
          Content-Type:application/json
          Authorization: Basic ABC123
Request Body:
          {
           "currency": "NZD",
           "merchantReference": "ABC12345",
           "recurringAmount": "15.00",
           "recurringStartDateTime": "2024-10-15T13:00:00Z",
           "recurringTimeZone": "NZT",
           "recurringCount": 12,
           "recurringFrequency": "monthly",
           "cardId": "123456789012345",
           "customerId": "0000000000123456"
          }
The merchant webserver extracts the status of the subscription to confirm it is active and stores the subscription Id for future use including Query, Update or Delete Subscription requests.
Below is an example of a simple Create Subscription response:
Response Body:
{
"id": "000000043w553545",
"status": "active",
"currency": "NZD",
"merchantReference": "ABC12345",
"recurringAmount": "15.00",
"recurringStartDateTime": "2024-10-15T13:00:00Z",
"recurringTimeZone": "NZT",
"recurringCount": 12,
"recurringFrequency": "monthly",
"recurringNextScheduledDateTime": "2024-11-15T13:00:00+12:00",
"card": {
"id": "123456789012345",
"cardNumber": "41111111*******111"
},
"customer": {
"id": "0000000000123456",
"firstName": "John",
"lastName": "Smith"
},
"invoices" : [
],
"links": [
{
The status value may display as:
| Field Name | Description |
|---|---|
| status | Status of the response. Values are:
|
The possible HTTP status codes include:
| 200 OK | When Windcave ran a de-duplication logic and found a subscription with the same data and same X-ID |
| 201 Created | The subscription has been successfully created |
| 400 Bad Request | A required field is missing or field is in an invalid format |
| 404 Not Found | When Windcave ran a de-duplication logic and found a subscription with the same data and same X-ID, but were not able to find and load the details of that subscription |
| 409 Conflict | When attempting to submit two Create Subscription requests with the same X-ID but different payload |
| 429 Too Many Requests | When attempting to simultaneously submit two Create Subscription requests with the same X-ID |
| 500 Internal Server Error | When Windcave are not able to add a subscription for unexpected reasons |
Update Subscription
Updating a current subscription allows merchants to easily change the frequency, amount or recurring count.
The merchant webserver sends an Update subscription request with the details that need to be updated.
Input values that can be updated are shown below:
| Field Name | Description |
|---|---|
| recurringAmount | The amount for the recurring transactions, e.g. 100.00 |
| merchantReference | Specifies the reference that the merchant wants to assign to the subscription. Note: When the billing cycle is run, the billing token's merchantReference used in the recurring transaction NOT the merchantReference of the subscription. |
| currency | Specifies the currency for recurring transactions. If omitted, the user's default currency is used. Note: If currency is specified, the 'recurringAmount' must also be entered |
| recurringCount | The number of subscription payments - This must be greater than the number of already executed billing cycles. |
| recurringFrequency |
The frequency of the subscriptions. Values are:
|
| cardId | Specifies the billing token ID that will be used for running recurring transactions. Note: If the originally created subscription has been associated with the customer (whether exility by including customerId, or implicitly by using a cardId that was associated with the customer), this new cardId has to be associated with the same customer as well. |
| notificationUrl | Specifies the merchant's endpoint that will accept and handle FPRN notifications. Please note the notificationUrl should not require cookies in the request to function, the FPRN notification is sent from Windcave not the cardholders browser. |
| retriesCount | Specifies how many times to reattempt failed payments. If omitted, the retriesCount from the user settings will be used. |
| retriesFrequency | The frequency to reattempt failed payments. If omitted, the default of "daily" will be applied.
|
To ensure that the subscription runs as expected, there are some rules to Updating Subscriptions:
- Subscription bound to a customer directly cannot be updated with a stored card that is not associated with that customer.
- The update amount cannot be 0
- recurringCount cannot be reduced below count of executed invoices. e.g. subscription has completed 4 invoices, the recurringCount cannot be less than 4.
Example Scenario
From the Create Subscription example, the merchant has created a subscription for $15.00 on a monthly basis.
- On request from the customer, the merchant has completed a request to change the subscription from $15.00 monthly to $100 annually.
- Windcave updates the amount and frequency but leaves the Next Run Time intact. As the customer has already paid for the current month, they will be charged $100.00 on the next billing cycle (15/11/2024), with the next run time set to 15/11/2025.
Using the example above, the below request outlines a simple Update Subscription request:
Endpoint:
PUT https://sec.windcave/api/v1/subscriptions/0000000b000012345
Headers:
          Content-Type:application/json
          Authorization: Basic ABC123
Request Body:
          {
           "recurringAmount": "100.00",
           "merchantReference": "ABC12345",
           "recurringCount": 12,
           "recurringFrequency": "annually",
           "cardId": "123456789012345"
          }
Below is an example of an Update Subscription response:
Response Body:
{
"id": "000000043w553545",
"status": "active",
"currency": "NZD",
"merchantReference": "ABC12345",
"recurringAmount": "100.00",
"recurringStartDateTime": "2024-02-03T13:00:00Z",
"recurringTimeZone": "NZT",
"recurringCount": 12,
"recurringFrequency": "annually",
"recurringNextScheduledDateTime": "2024-08-03T13:00:00+12:00",
"card": {
"id": "123456789012345",
"cardNumber": "41111111*******111"
},
"customer": {
"id": "0000000000123456",
"firstName": "John",
"lastName": "Smith"
},
"invoices" : [
],
"links": [
{
The status value may display as:
| Field Name | Description |
|---|---|
| status | Status of the response. Values are:
|
The possible HTTP status codes include:
| 200 OK | When the subscription has been successfully updated |
| 400 Bad Request | When there is an issue with one of the included fields |
| 404 Not Found | When attempting to modify a non-existing subscription |
| 422 Unprocessable | When attempting to update the subscription during the short lock period (right before, or right after the billing cycle) when we don't allow it to be modified. In this instance, the merchant has to re-try the attempt at a later time. |
Delete Subscription
Once a subscription has completed the configured recurringCount specified, the subscription status will update to Finished and Next Run Time will update to Complete - No further transactions will occur.
Alternatively, if a subscription is requested to be cancelled, the merchant can simply put through a Delete Subscription request.
Example Scenario- At the request from the customer, the merchant has completed a Delete Subscription request.
- Windcave updates the status of the subscription to Cancelled and removes the Next Run Time. No further transactions will occur, and the Subscription becomes Disabled.
The merchant webserver reads the Delete request and cancels the subscription.
Query Customer will display the history of the subscription transactions.
Query Subscription
The merchant webserver can obtain the results of the subscription transactions to view or update internal systems as required, including the recurring amount, frequency, merchant reference and subscription status.
Customer relationshipA subscription query is not required to have a customer associated, however when the subscription is bound to the customer, whether explicitly by specifying the customerId or implicitly by using the billing token associated with the customer, the subscription details will be included into the Query Customer.
Merchants can request to query a subscription to review the subscription details including a list of transactions and the subscription status.
Possible HTTP status values are:
| 200 OK | When the subscription has been found and the details are returned |
| 400 Bad Request | When attempting to query a non-existing subscription |
| 404 Not Found | When the format of a subscription ID is invalid |
During the initial billing cycle, after the invoice is generated, the query subscription will display subscription details including the created date, frequency and recurring amount.
Once complete, the invoice Id can be used in a Query Invoice request to retrieve details of the transaction attempts associated with the invoice.
Below is an example of a basic Query Subscription request and subsequent response:
Endpoint:
GET https://sec.windcave/api/v1/subscriptions/0000000b000012345
Headers:
          Content-Type:application/json
          Authorization: Basic ABC123
Response Body:
{
"id": "000000043w553545",
"status": "active",
"currency": "NZD",
"merchantReference": "ABC12345",
"recurringAmount": "15.00",
"recurringStartDateTime": "2024-02-03T13:00:00Z",
"recurringTimeZone": "NZT",
"recurringCount": 12,
"recurringFrequency": "daily",
"recurringNextScheduledDateTime": "2024-08-03T13:00:00Z",
"card": {
Query Customer
The merchant webserver can obtain customer information related to a subscription.
The Query Customer request will display subscription details including the customer Id and subscription details.
Below is a basic Query Customer request and subsequent response:
Endpoint:
GET https://sec.windcave/api/v1/customers/00000436654365643
Headers:
          Content-Type:application/json
          Authorization: Basic ABC123
Response Body:
{
"id": "00000436654365643",
"firstName": "John",
"lastName": "Smith",
"email": "[email protected]",
"phoneNumber": "+6421384236",
"account": "9999999999999999",
"cards": [
Query Invoice
Each billing cycle generates a new invoice with the status Created. When the subscription payment transaction is successful, the invoice status changes to Paid.
If the payment fails, the invoice status changes to Unpaid and Windcave will re-attempt the payment daily per configured max re-attempts for the REST user.
The status of the invoice will indicate whether it has been paid of not. The possible statuses of the invoice are:
| Created | An invoice has been created |
| Due | The invoice has been created but the transaction has not been attempted |
| Paid | The invoice has been successfully fulfilled |
| Unpaid | The invoice payment has failed |
| PaymentInProgress | The invoice payment attempt is about to happen |
When an invoice is created, the DueDate = CreatedDate
All payment attempts (transactions) will be recorded against the invoice. Subscriptions will therefore have a list of invoices, with each invoice having a list of transactions against it.
The possible HTTP status codes include:
| 200 OK | When the invoice has been found and the details are returned |
| 400 Bad Request | When the format of the invoice ID is invalid |
| 404 Not Found | TWhen attempting to query a non-existing invoice |
Below is an example of a Query Invoice request and subsequent response:
Endpoint:
GET https://sec.windcave/api/v1/invoices/0000000b000012345
Headers:
          Content-Type:application/json
          Authorization: Basic ABC123
Response Body:
{
"id": "0000000000123456",
"createdDateTime": "2024-03-15T03:50:21Z",
"dueDateTime": "2024-03-15T03:50:21Z",
"merchantReference": "ABC123456",
"amount": "100.00",
"currency": "NZD",
"status": "unpaid",
"customer": {